At Rune, we love all types of games—from 2D to isometric to 3D—and we want you to build with the tools you prefer on our platform. Creating 3D games introduces some extra pieces, like camera controls and character movement, which takes time to make feel natural, even in single-player settings. The examples below serve as a straightforward reference for building 3D games with Three.js on the Rune platform.
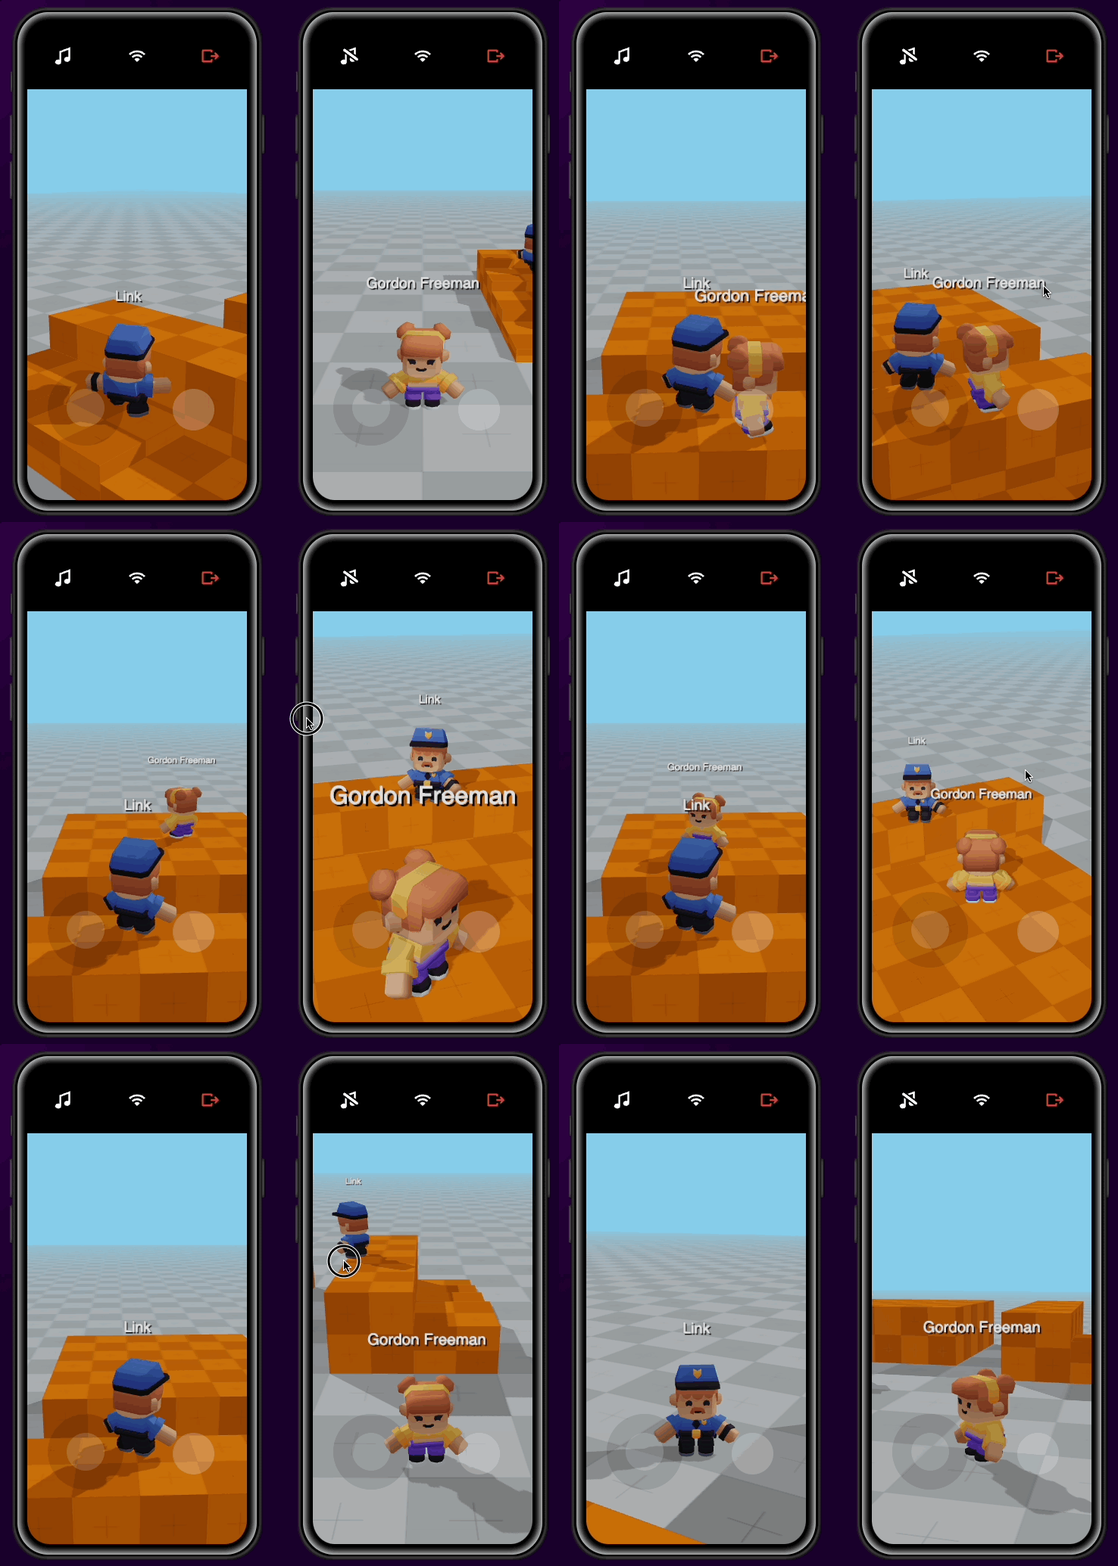
You can give the demo a play in the tech demos section of the docs.
Approach
Building a 3D game is more time consuming than a 2D game, though the multiplayer components remain essentially the same when using the Rune SDK. In this tech demo, we'll cover key aspects of building a multiplayer 3D game:
- Rendering, shadows, and lighting
- Model loading
- Character and camera controllers
- Input and virtual joystick
- Multiplayer support with the Rune SDK
We’ll follow a similar approach to previous tech demos, where player inputs are exchanged between the client and logic layers. The logic layer manages all updates to the game world, including collisions. On the client side, we ensure our 3D world mirrors the logical world, interpolating between positions and rotations for smooth visuals.
With fantastic assets from Kenney.nl, we’ll build a small scene for players to explore together.
Rendering, Shadows, and Lighting
Setting Up the Renderer
Below is the configuration for a high-quality yet mobile-friendly Three.js renderer. Key configuration options include:
- Power Preference - Maximizes graphics performance on mobile devices, though it can drain battery life more quickly. Adjust this if rendering frequency can be reduced.
- Anti-aliasing - Smooths jagged edges in 3D rendering, significantly improving visual quality.
- Tone Mapping - Adjusts color depth and shading. For vibrant colors,
ACESFilmicToneMapping offers a rich, deep effect. - Shadows - Adds realism by enabling shadows, though it can be demanding on low-end devices. Shadows must be enabled separately for both meshes and lights.
const scene: Scene = new Scene()
const renderer = new WebGLRenderer({
powerPreference: "high-performance",
antialias: true,
})
renderer.toneMapping = ACESFilmicToneMapping
renderer.shadowMap.enabled = true
renderer.shadowMap.type = PCFShadowMap
renderer.setSize(window.innerWidth, window.innerHeight)
document.body.appendChild(renderer.domElement)
const skyBlue = 0x87ceeb
scene.background = new Color(skyBlue)
scene.fog = new FogExp2(skyBlue, 0.02)
setInterval(() => {
render()
}, 1000 / RENDER_FPS)
This setup creates a DOM element (canvas) for the renderer and attaches it to the document. We set a sky-blue background with fog to add depth and enhance visual appeal.
We use a setInterval loop at 30 FPS, though requestAnimationFrame() could be used for a higher frame rate. To optimize performance on low-end devices, we cap it at 30 FPS.
The render function updates game elements as follows:
updateInput()
const localPlayer = getLocalCharacter3D()
if (localPlayer) {
getShadowingLightGroup().position.x = localPlayer.model.position.x
getShadowingLightGroup().position.z = localPlayer.model.position.z
updateCamera(localPlayer)
}
updateCharacterPerFrame(1 / RENDER_FPS)
renderer.render(scene, getCamera())
The input, camera, lighting, and character updates shown here will be discussed later in this article.
Lights and Shadows
In addition to the renderer, we need to light the scene and enable shadows. Three.js includes built-in shadow mapping, which we configure below.
- Ambient Light - Provides basic visibility across the scene but doesn’t add shading.
- Directional Light - Illuminates models from a specific direction, adding shading; it also serves as the source of shadows.
ambientLight = new AmbientLight(0xffffff, 1)
getScene().add(ambientLight)
lightGroup = new Object3D()
directionalLight = new DirectionalLight(0xffffff, 1)
directionalLight.position.set(-3, 3, 3)
lightGroup.add(directionalLight)
lightGroup.add(directionalLight.target)
getScene().add(lightGroup)
directionalLight.castShadow = true
directionalLight.shadow.mapSize.width = SHADOW_MAP_SIZE
directionalLight.shadow.mapSize.height = SHADOW_MAP_SIZE
directionalLight.shadow.camera.near = SHADOW_MAP_NEAR_PLANE
directionalLight.shadow.camera.far = SHADOW_MAP_FAR_PLANE
directionalLight.shadow.camera.left = -SHADOW_MAP_BOUNDS
directionalLight.shadow.camera.right = SHADOW_MAP_BOUNDS
directionalLight.shadow.camera.top = SHADOW_MAP_BOUNDS
directionalLight.shadow.camera.bottom = -SHADOW_MAP_BOUNDS
We configure the shadow generator’s frustum to control the extent of the shadows. Shadow mapping renders the scene from the light’s perspective, creating a texture to display shadows. By moving the directional light with the player, shadows are rendered only locally, optimizing performance.
Model Loading
Three.js simplifies model loading, especially when using Kenney’s GLTF models. Here’s a loader function for GLTF models:
function loadGLTF(url: string): Promise<GLTF> {
  console.log("Loading: ", url)

  return new Promise<GLTF>((resolve, reject) => {
    gltfLoader.load(
      url,
      (model) => {
        model.scene.traverse((child) => {
          child.castShadow = true
          child.receiveShadow = true
        })
        resolve(model)
      },
      undefined,
      (e) => {
        reject(e)
      }
    )
  })
}
To ensure all models can cast and receive shadows, we traverse each loaded model. If textures aren’t automatically loaded, we apply them manually as shown below.
export function loadTexture(url: string): Promise<Texture> {
  return new Promise<Texture>((resolve, reject) => {
    textureLoader.load(
      url,
      (texture) => {
        texture.colorSpace = SRGBColorSpace
        resolve(texture)
      },
      undefined,
      (e) => {
        reject(e)
      }
    )
  })
}

export function applyTexture(obj: Object3D, texture: Texture) {
  obj.traverse((node) => {
    if (node instanceof Mesh) {
      node.material = new MeshLambertMaterial({ map: texture })
    }
  })
}
Character and Camera Controller
Creating a responsive 3D character and camera controller can be an intricate task. For instance, our recent release, MeatSuits, features a controller inspired by Roblox. This demo distills the basics of that controller.
First, we set up a basic perspective camera:
const lookAt: Vector3 = new Vector3(0, 1, 0)
let targetAngleY: number = 0
let targetAngleZ: number = Math.PI

const camera: PerspectiveCamera = new PerspectiveCamera(
  45,
  window.innerWidth / window.innerHeight,
  0.1,
  150
)
We then update the camera’s position and target each frame to ensure smooth motion:
export function updateCamera(targetCharacter: Character3D) {
  const cameraHeight = 2
  const cameraDistance = 4
  const cameraSoftness = 0.2
  const cameraTargetHeight = 1

  const { x, y, z } = targetCharacter.model.position

  const targetPosition = new Vector3(cameraDistance, 0, 0)
  targetPosition.applyEuler(new Euler(0, -targetAngleY, -targetAngleZ))
  targetPosition.add(new Vector3(x, y + cameraHeight, z))

  camera.position.lerp(targetPosition, cameraSoftness)
  lookAt.lerp(new Vector3(x, y + cameraTargetHeight, z), cameraSoftness)
  camera.lookAt(lookAt)
}
It’s simple, right? The real trick with the Roblox-style controller is that joystick movement is interpreted based on the camera’s current viewpoint. So pushing up on the joystick always moves forward in the view, and pushing left always moves left relative to the camera.
But how do we turn corners, then? As we’ll see in the input section below, there’s a subtle tweak to the rules applied on the client side.
While the demo may seem to use only a couple of inputs, there are actually several elements that make the controller feel "right." First is the camera view adjustment—this allows players to drag the view using a second finger (separate from joystick control). For us, this is configured in the renderer code:
renderer.domElement.addEventListener("touchstart", (e) => {
  mouseX = e.targetTouches[0].clientX
  mouseY = e.targetTouches[0].clientY
  mouseDown = true
})
renderer.domElement.addEventListener("touchend", () => {
  mouseDown = false
})
renderer.domElement.addEventListener("touchmove", (e) => {
  if (mouseDown) {
    const dx = e.targetTouches[0].clientX - mouseX
    const dy = e.targetTouches[0].clientY - mouseY
    mouseX = e.targetTouches[0].clientX
    mouseY = e.targetTouches[0].clientY

    rotateCameraZ(dy * 0.01)
    rotateCameraY(dx * 0.01)
  }
})
Pretty simple, right? Dragging a finger on the renderer’s background adjusts the camera rotation.
Next, we handle the "real" input through the joystick and jump button, retrieving the joystick state (and following key presses if testing on the web):
const joystickState = getJoystickState()
const currentControls: Controls = {
x: 0,
y: 0,
cameraAngle: getCameraAngle(),
jump: isKeyDown(" ") || jump,
}
if (isKeyDown("a") || joystickState.x < -DEAD_ZONE) {
currentControls.x = isKeyDown("a") ? -1 : joystickState.x
}
if (isKeyDown("d") || joystickState.x > DEAD_ZONE) {
currentControls.x = isKeyDown("d") ? 1 : joystickState.x
}
if (isKeyDown("w") || joystickState.y > DEAD_ZONE) {
currentControls.y = isKeyDown("w") ? 1 : joystickState.y
}
if (isKeyDown("s") || joystickState.y < -DEAD_ZONE) {
currentControls.y = isKeyDown("s") ? -1 : joystickState.y
}
Note that we’re also recording the current cameraAngle as part of the controls. This allows the movement code in the logic (see below) to interpret the inputs correctly.
Next, we add a small tweak that lets us turn corners. When moving left or right, we move perpendicular to the camera angle, but we also gently turn the camera along with the movement:
if (currentControls.x < 0) {
rotateCameraY(-CAMERA_ROTATE * (Math.abs(currentControls.x) - DEAD_ZONE))
}
if (currentControls.x > 0) {
rotateCameraY(CAMERA_ROTATE * (Math.abs(currentControls.x) - DEAD_ZONE))
}
This means that if the player is running left or right, the camera tries to turn to follow them. If they keep moving in those directions, they’ll eventually run in a circle since movement is relative to the camera angle.
Once we have the controls for this frame, we need to update the logic accordingly. Rune prevents network flooding by allowing only 10 updates per second, so we avoid sending updates too frequently or when control inputs haven’t changed:
if (
lastSentControls.x !== currentControls.x ||
lastSentControls.y !== currentControls.y ||
lastSentControls.cameraAngle !== currentControls.cameraAngle ||
lastSentControls.jump !== currentControls.jump
) {
if (
Date.now() - lastSentTime > CONTROLS_SEND_INTERVAL ||
currentControls.jump ||
(currentControls.x === 0 &&
currentControls.y === 0 &&
(lastSentControls.x !== 0 || lastSentControls.y !== 0))
) {
Rune.actions.update(currentControls)
lastSentControls = currentControls
lastSentTime = Date.now()
jump = false
}
}
However, if we stop moving or jump, we want to send that input immediately—this ensures the player feels direct control over their character. Any delay in stopping would make the player feel "lag".
Now we have input, models, a renderer, lighting, and shadows! All that’s left is to make the demo multiplayer.
Multiplayer Support
Let’s start by looking at the client code. As we’ve seen in previous tech demos, there’s a callback that Rune uses to notify us of game state updates: onChange:
Rune.initClient({
onChange: ({ game, yourPlayerId }) => {
buildGameMap(game.map)
for (const char of game.characters) {
if (!getCharacter3D(char.id)) {
const char3D = createCharacter3D(char)
if (char.id === yourPlayerId) {
localPlayerCharacter = char3D
}
}
updateCharacter3DFromLogic(char)
}
for (const id of getCurrentCharacterIds()) {
if (!game.characters.find((c) => c.id === id)) {
removeCharacter3D(id)
}
}
},
})
That’s all of our onChange code. Here’s how we apply it:
- Build the game map if we haven’t already (see below)
- Ensure any characters defined in the logic have a 3D model in our world
- Update any models in our world based on the logic state
- Remove any models in our world that don’t exist in the logic
On the logic side, we have a bit more to consider. Our game state is lightweight, containing the player’s input, the game world, and the character moving within it:
export interface GameState {
map: GameMap
controls: Record<PlayerId, Controls>
characters: Character[]
}
When we start up, we add a character to the world for each player:
setup: (allPlayerIds) => {
const state: GameState = {
map: createGameMap(),
controls: {},
characters: [],
}
for (const id of allPlayerIds) {
addCharacter(id, state)
}
return state
},
Similarly, when players join or leave, we simply update the characters in the world:
events: {
playerLeft: (playerId, { game }) => {
game.characters = game.characters.filter((c) => c.id !== playerId)
},
playerJoined: (playerId, { game }) => {
addCharacter(playerId, game)
},
},
In the logic's update() loop, we move the characters around the world based on their inputs. The key detail here is that the player's inputs are interpreted relative to their camera angle:
if (controls && (controls.x !== 0 || controls.y !== 0) && character) {
const newPos = getNewPositionAndAngle(controls, character.position)
const height = findHeightAt(game, newPos.pos.x, newPos.pos.z)
const step = height - character.position.y
if (step < MAX_STEP_UP) {
if (step > 0) {
character.position.y = height
}
character.position.x = newPos.pos.x
character.position.z = newPos.pos.z
character.lastMovementSpeed =
Math.sqrt(controls.x * controls.x + controls.y * controls.y) *
MOVE_SPEED
}
character.angle = newPos.angle
} else if (character) {
character.lastMovementSpeed = 0
}
We’ll cover the map height calculations in the next section, but the key function here is getNewPositionAndAngle(). This function takes the player’s input and determines the new position and angle relative to the player’s camera angle:
export function getNewPositionAndAngle(
  controls: Controls,
  pos: Vec3
): { pos: Vec3; angle: number } {
  const dir = getDirectionFromAngle(controls.cameraAngle)
  const result = {
    pos: { ...pos },
    angle: 0,
  }
  result.angle = -(controls.cameraAngle - Math.atan2(-controls.x, controls.y))
  if (controls.x < 0) {
    result.pos.x += dir.z * MOVE_SPEED_PER_FRAME * Math.abs(controls.x)
    result.pos.z -= dir.x * MOVE_SPEED_PER_FRAME * Math.abs(controls.x)
  }
  if (controls.x > 0) {
    result.pos.x -= dir.z * MOVE_SPEED_PER_FRAME * Math.abs(controls.x)
    result.pos.z += dir.x * MOVE_SPEED_PER_FRAME * Math.abs(controls.x)
  }
  if (controls.y < 0) {
    result.pos.x -= dir.x * MOVE_SPEED_PER_FRAME * Math.abs(controls.y)
    result.pos.z -= dir.z * MOVE_SPEED_PER_FRAME * Math.abs(controls.y)
  }
  if (controls.y > 0) {
    result.pos.x += dir.x * MOVE_SPEED_PER_FRAME * Math.abs(controls.y)
    result.pos.z += dir.z * MOVE_SPEED_PER_FRAME * Math.abs(controls.y)
  }
  return result
}
This ensures that the player's controls are always relative to their camera’s direction, achieving the Roblox-style character controller we wanted.
Rendering the Map
What would the world be without a map to explore? In this tech demo, our map is a simple grid of heights that generates blocks for players to explore. Our game map definition is as follows:
export type GameMapElement = number
export type GameMap = GameMapElement[]
Since the map is simply an array of 1x1 blocks, determining the height at any given location is highly efficient:
export function getHeightAt(map: GameMap, x: number, z: number) {
  x = Math.floor(x)
  z = Math.floor(z)
  return map[x + z * GAME_MAP_WIDTH] ?? 0
}
This approach is useful because we’re using a fairly brute-force collision detection on the server. We determine the height at a player’s position by sampling around the player and selecting the maximum height. Each time the player attempts to move, we calculate the height at the new location and compare it to the player’s current height:
- If it’s lower, the player needs to fall.
- If it’s the same, there’s no change on the y-axis.
- If it’s slightly higher, the player should step up onto the block.
- If it’s significantly higher, the player can’t move to that location.
You can see this logic in the update() function, which calls our sampling function findHeightAt, as shown below:
function findHeightAt(game: GameState, x: number, z: number) {
  let maxHeight = 0
  const characterSize = 0.5
  const step = characterSize / 5
  for (
    let xoffset = -characterSize / 2;
    xoffset <= characterSize / 2;
    xoffset += step
  ) {
    for (
      let zoffset = -characterSize / 2;
      zoffset <= characterSize / 2;
      zoffset += step
    ) {
      maxHeight = Math.max(
        maxHeight,
        getHeightAt(game.map, x + xoffset, z + zoffset)
      )
    }
  }

  return maxHeight
}
Finally, we want to visualize the game map in the 3D world for players to explore. Since the game map is part of the game state, it’s also accessible to the client. At the start of the tech demo, we call buildGameMap():
export function buildGameMap(map: GameMap): void {
for (let x = 0; x < GAME_MAP_WIDTH; x++) {
for (let z = 0; z < GAME_MAP_HEIGHT; z++) {
const height = getHeightAt(map, x, z)
if (height) {
const geometry = new BoxGeometry(1, 1, 1)
const material = new MeshLambertMaterial({ map: wallTexture })
const cube = new Mesh(geometry, material)
cube.castShadow = true
cube.receiveShadow = true
cube.scale.y = height
cube.position.x = x + 0.5
cube.position.y = height / 2
cube.position.z = z + 0.5
getScene().add(cube)
}
}
}
}
As you can see, we cycle through the locations with a defined height and create a textured box to represent each height level. This provides players with a bare-bones world to navigate.
With Three.js, building a 3D game is accessible for any web developer. Adding multiplayer with the Rune SDK is also straightforward. Hopefully, the code in this tech demo covers most cases where a game needs a well-rendered 3D world and familiar controls as a foundation for something exciting!
Looking forward to seeing the 3D games you build on Rune!
Want to learn more? Join us on Discord for a chat!
Subscribe to our newsletter for more game dev blog posts
