21 posts tagged with "Game Development"

View All Tags

· 13 min read
Kevin Glass

At Rune, we're helping devs make casual multiplayer games using JS that are played by groups of friends on our iOS + Android app. There's been a lot of excitement among devs about using AI to power wacky gameplay so we added AI to the Rune SDK. To dogfood this, I decided to build out some AI games to explore what interesting gameplay could be achieved using LLMs. So I set myself a challenge. Can I build 7 multiplayer AI games in 7 days?

Here's what happened, the MIT-licensed source code and what I learnt during the process. I've recorded a little video playing all the games to give a quick feel for what they're like.

Day 1 - Storyteller AI
Play! | Kick Off | Time Lapse | Post-Mortem | Code

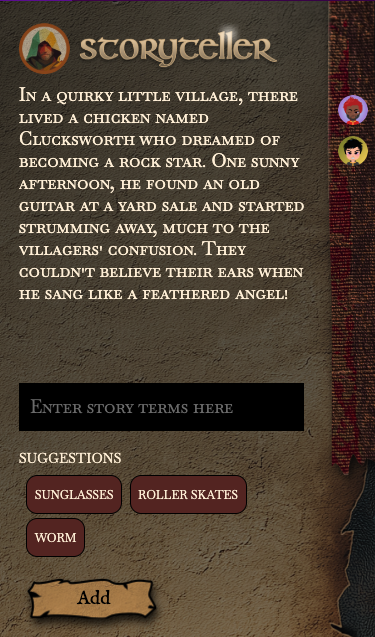
The first game, Storyteller AI, has the players collaboratively write an epic story together by suggesting simple terms that the AI then weaves into the story. There's no winner, or rather everyone is a winner with a brand new story created. The fun comes when people start suggesting strange and wacky terms which are attributed to them in the story.

What did I learn?

  • The first game was always going to find the edges of the implementation and naturally the development ran into a few bugs which were fixed along with writing the game on the first day.
  • Prompting an AI to write a story needs guidelines otherwise it just goes no where. It's important to set out clearly that there will need to be a conclusion in a fixed number of iterations.
  • Players struggle to think of suitable terms, having the AI suggest some seems like an AI talking to an AI, but playtesters appreciated having the suggestions.
  • The OpenAI API can take 10+ seconds to respond now and again, you have to account for that possibility in design.

Day 2 - Dating AI Game
Play! | Kick Off | Time Lapse | Post-Mortem | Code

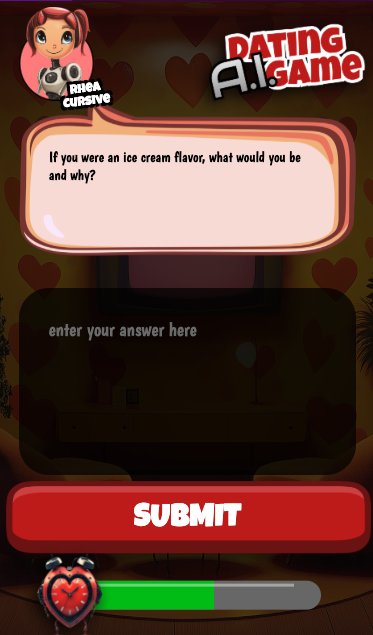
Definitely my favorite idea from the original list, the Dating AI Game is based on those old blind dating shows from the 70s and 80s. Players take the part of contestants attempting to win a date by answering their potential date's questions in the most fun way. The AI plays the part of the question asker and the overall narrator. Players really do seem to enjoy this one, particularly entering the most rude answer they can think of.

What did I learn?

  • Players will always try to be rude / outlandish - make the choice how you want the AI to respond, don't leave it to chance!
  • Asking the AI to execute 'three rounds of questions and then a conclusion' doesn't always result in 3 rounds - sometimes 2, sometimes 8. You need to be very strict and clear when the game should finish. Even if all your examples are 3 rounds, the AI may not pick up on this.
  • Coming up with varied questions is difficult for the AI, especially in a constrained contextual scenario like a old school dating show when driven by examples. It often repeats the same questions in different sessions. You can get better results by explaining the reason for the example, e.g. The example below is for structure not for content. Please come up with as varied questions and responses as possible.

Day 3 - Find the AI
Play! | Kick Off | Time Lapse | Post-Mortem | Code

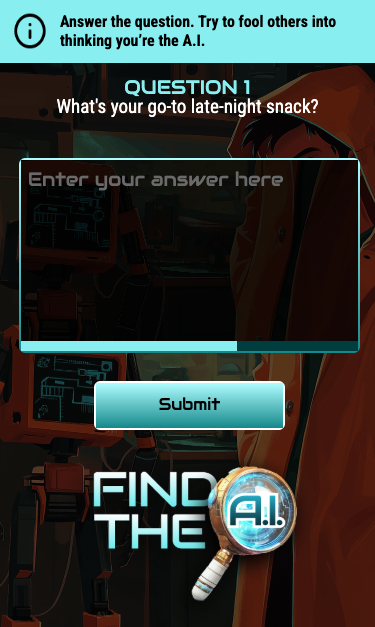
With Find the AI, I'm adapting the good old Werewolf into a simple Rune game. The AI generates a simple question, players answer it and so does the AI. The AI has been instructed to sound as human as possible including adding typos and slang. The players are then presented all the answers and have to guess which one is the AI. Having the AI act human is fun, but watching players trying to sound like an AI is really great.

What did I learn?

  • Making an AI sound human isn't easy.
  • AI responses tend to be elaborate and use great grammar and spelling. Humans, especially those using mobile keyboards, don't do that. They generally use short answers and they make mistakes (auto correct is everyone's friend right?).
  • Asking the AI to sound more human with Use slang or abbreviations to sound more human results in an obvious AI that is intentionally making a mistake every time and throwing in slang for no reason.
  • Giving the AI a "dial" gives the best results, use slang 50% of the time, make an auto-correct mistake 10% of the time seemed to give better more human responses but didn't make it into the final game.

Day 4 - The AI Times
Play! | Kick Off | Time Lapse | Post-Mortem | Code

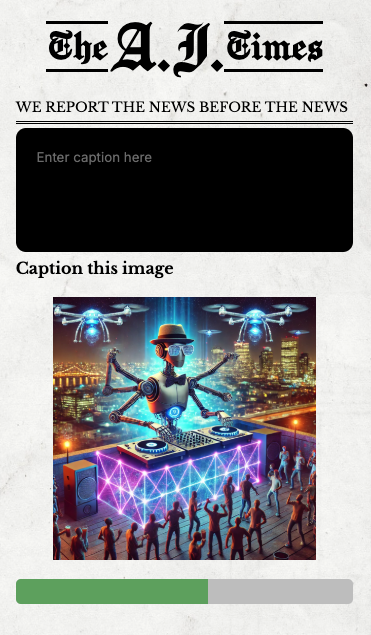
A novel idea that was conceptualized by the team. Players are presented with a random image and asked to provide a short caption. The generative AI is then prompted to create a tabloid style front page including headline and tag line. The players then vote on their favorite story to choose a winner. The combination of abstract, quirky images and the imagination of the players results in some really wonderfully silly front pages.

What did I learn?

  • Telling the AI what to value as input is really important. In this case I am feeding the AI with the player's caption and a description of the image that was provided to the player (generated offline). Initially the AI was producing essentially the same story for all players because they all had the same image.
  • Being explicit about the weight to apply to the inputs helped a lot, e.g. The player's input should be considered 10x more important than the content of the image when writing the articles

Day 5 - GIF vs AI
Play! | Kick Off | Time Lapse | Post-Mortem | Code

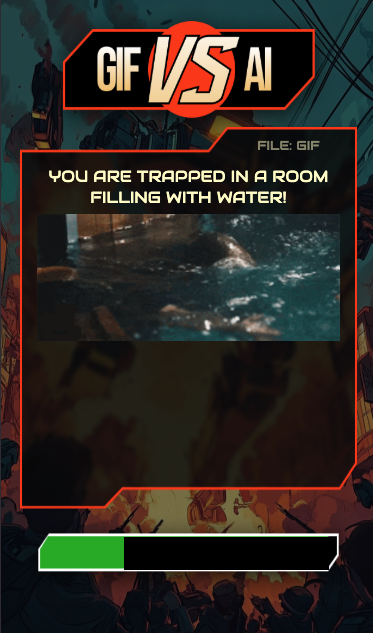
Probably the player favorite so far is GIF vs AI, a twist on the popular Death by AI game. The AI generates a life-threatening scenario and a GIF is chosen to represent it. Players then have to respond with how they'll attempt to survive by selecting a GIF. Finally, the AI evaluates the scenario and the provided survival GIF to determine if the player survives and selects a GIF to represent the outcome. Adding in the GIFs makes the game faster to play and the AI interpretation of the GIF can lead to unintended and funny outcomes.

What did I learn?

  • The Tenor generated GIF descriptions that are provided as meta-data are often of just the first frame and don't include details of what happens in the animation. Though not accurate, in my case this leads to fun mistakes!
  • The AI appears capable of generating "good" search terms based on longer textual descriptions. While AI summarization is expected to be good I hadn't expected it to be able to extract the relevant terms from the text to get a reasonably accurate GIF result from a search.

Day 6 - AI Art Judge
Play! | Kick Off | Time Lapse | Post-Mortem | Code

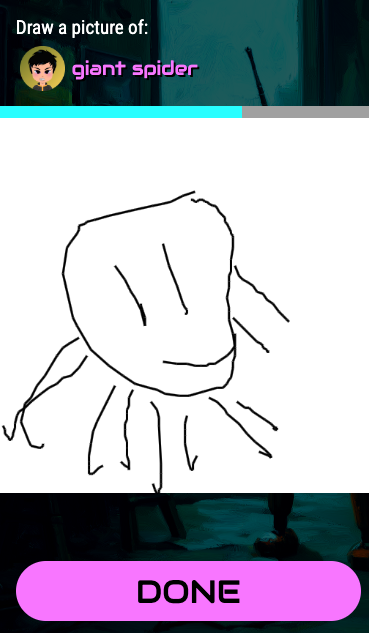
When adding AI capabilities to the SDK, I was quite happy that we added image analysis in as part of the same single API. The AI Art Judge game uses this to become an art critic. Players suggest a 'thing' to be drawn. They're then given a fixed time to draw a picture of the randomly-picked item. Once everyone is done, the AI evaluates the drawings based on the original input and provides an overly artsy and funny critique. It turns out AI is an expert in being pompous.

What did I learn?

  • Asking the AI which is the best "...." doesn't result in an understandable result for players. The AI often doesn't pick the objectively better representation of the item.
  • I ran out of time, but it may have been better to ask what is in this image and then get a match weight comparing that output with the original item description.
  • Image analysis isn't expensive as long as your images are smaller than 512x512 (generally plenty for this sort of game). Any bigger and costs go up quickly.

Day 7 - AI Emoji Interview
Play! | Kick Off | Time Lapse | Post-Mortem | Code

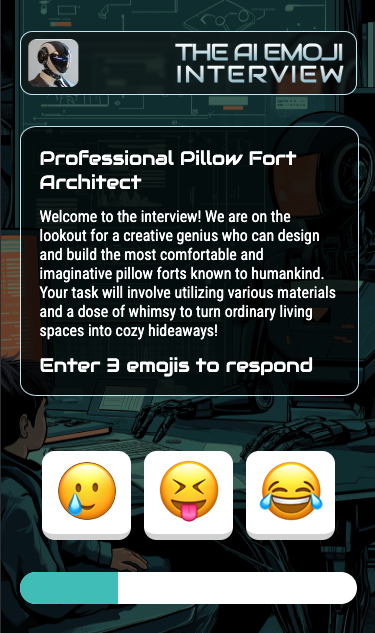
In the final game of the 7 days, I wanted to try out how AI interprets emojis. The AI Emoji Interview game has the AI acting an interviewer for a made up and crazy job opportunity. Players must take part in the interview but can only provide emojis as answers. The AI interprets the emojis as answers and eventually selects a player to get the job. Switching from text to emoji speeds the game up and players can still to get their point across easily.

What did I learn?

  • AI can understand emoji as easily as normal text. It can even interpret the meaning of combined emoji's in most common cases.
  • Similar to generating questions above, generating "crazy" jobs is difficult for AI. It tends to generate similar jobs even when asked to explore a broad search space. In hindsight it may have been better to generate 100 crazy jobs offline and used these as input rather than relying on a dynamically-generated job title.

General Observations

It's been an interest week of making games with lots of experimentation using AI through the Rune SDK. All the games were playable and fun to a level but could have been taken further and refined more. Here's some general impressions of using AI in games:

  • Examples are king! Providing examples to the AI as part of the initial prompt keeps the structure of the interaction manageable.
  • Structured output, e.g. asking the AI to produce JSON, seems to greatly decrease the appropriateness of the responses and limits the pseudo-creativity of the output.
  • The common advice is to repeat important parts of prompts towards the end of the initial prompt. This didn't seem to have much effect this week. Adding explicit rules at the end of the prompt that re-enforced some of the initial prompt had a larger impact.
  • Calling out early in the prompt that we're playing a game seems to result in the AI having a decent grasp immediately that there is likely to be a series of interactions. It also seems to set a tone for responses.
  • Using the system vs user role does have an impact. system should be used to set the rules of the game and the general structure. user should be used to capture player input. Prompting a set of runes using user role doesn't work as well as using system. Prompting player input in system role works find as long as you're prefixing the input with the user entered... but this becomes awkward quickly. Using system for player input also leaves more room open for players providing input to try and change the rules.

Preparation

Trying to create a game per day a game means getting everything in place beforehand. As I was always told, Prior Preparation Prevents Pretty Poor Performance. In this case I started with 25 ideas for AI games, whittled that down to 7 good ones and built wireframes to explore the design. Then our designer, the formidable Shane, took them and produced beautiful graphics in the associated themes.

With the designs in hand I was ready for building 7 AI games in 7 Days.

Rules

If you're going to have a challenge, you might as well set out the rules at the start so here goes:

  1. 7 Days is consecutive working days - weekends off!
  2. A day is a normal 8-hour working stint. No pulling an all-nighter and claiming the game was built in a day.
  3. Games start from the Rune standard TypeScript template.
  4. Code reuse between games is done via copy-paste of common code. No building a library and then building 7 games on it.
  5. All games should run in the Dev UI and on the production Rune app.
  6. Of course, all the games should be built using Rune!

How does it work?

Let's take a quick look at how the Rune SDK exposes AI to developers. It's quite simple to work with and that's what made it possible to churn out these games. You can check out the full documentation for more details.

Prompting the AI

To send a prompt to the AI, we invoke Rune.ai.promptRequest() from anywhere in our logic code, passing a collection of messages for the AI to interpret. Since the AI API is stateless, we need to pass it the past messages and the new ones in the request if we want it to understand a full conversation.

As you can see below, the prompt request can take both text and image prompts. In the Rune SDK, we only support passing in data:// URI's for images because we'd want to ensure the games are always available to the players, hence not allowing dependencies on external images.

Rune.ai.promptRequest({
messages: [
{ role: "user",
content: { type: "text", text: "What is Rune.ai?" } },
{ role: "user",
content: { type: "image_data", image_url: dataUri } },
],
})

Getting AI responses

The response to the prompt is received through a callback in the game logic as shown below. The response text is provided back to the logic, which can then update game state.

Rune.initLogic({
...
ai: {
promptResponse: ({ response }) => {
console.log(response)
},
},
})

As you can tell, it's a quite minimal API. The idea was to make it as easy as possible to incorporate LLMs into the gameplay of Rune games. Behind the scenes, the SDK handles the requests/responses, exponential backoff in case of request failures, etc. It's all fairly standard stuff. The real magic is in Rune's netcode for syncing players and of course in the AI itself.

Conclusion

It's been a fun, if tiring, week writing a game a day. The games themselves have come out pretty fun and I'm looking forward to how they do when they hit the 100,000's of players available on the Rune platform. Pretty much all the guidance on writing prompts generally applied to using it for games - though it is somewhat challenging to keep the AI from expanding outside the rules you want to enforce for the game. I can't wait to see what kind of AI-powered games the future holds.

Any thoughts or suggestions for how we could have made the games better? Join us on the Rune Discord for a chat!

Subscribe to our newsletter for more game dev blog posts
We'll share your email with Substack
Substack's embed form isn't very pretty, so we made our own. But we need to let you know we'll subscribe you on your behalf. Thanks in advance!

· 15 min read
Kevin Glass

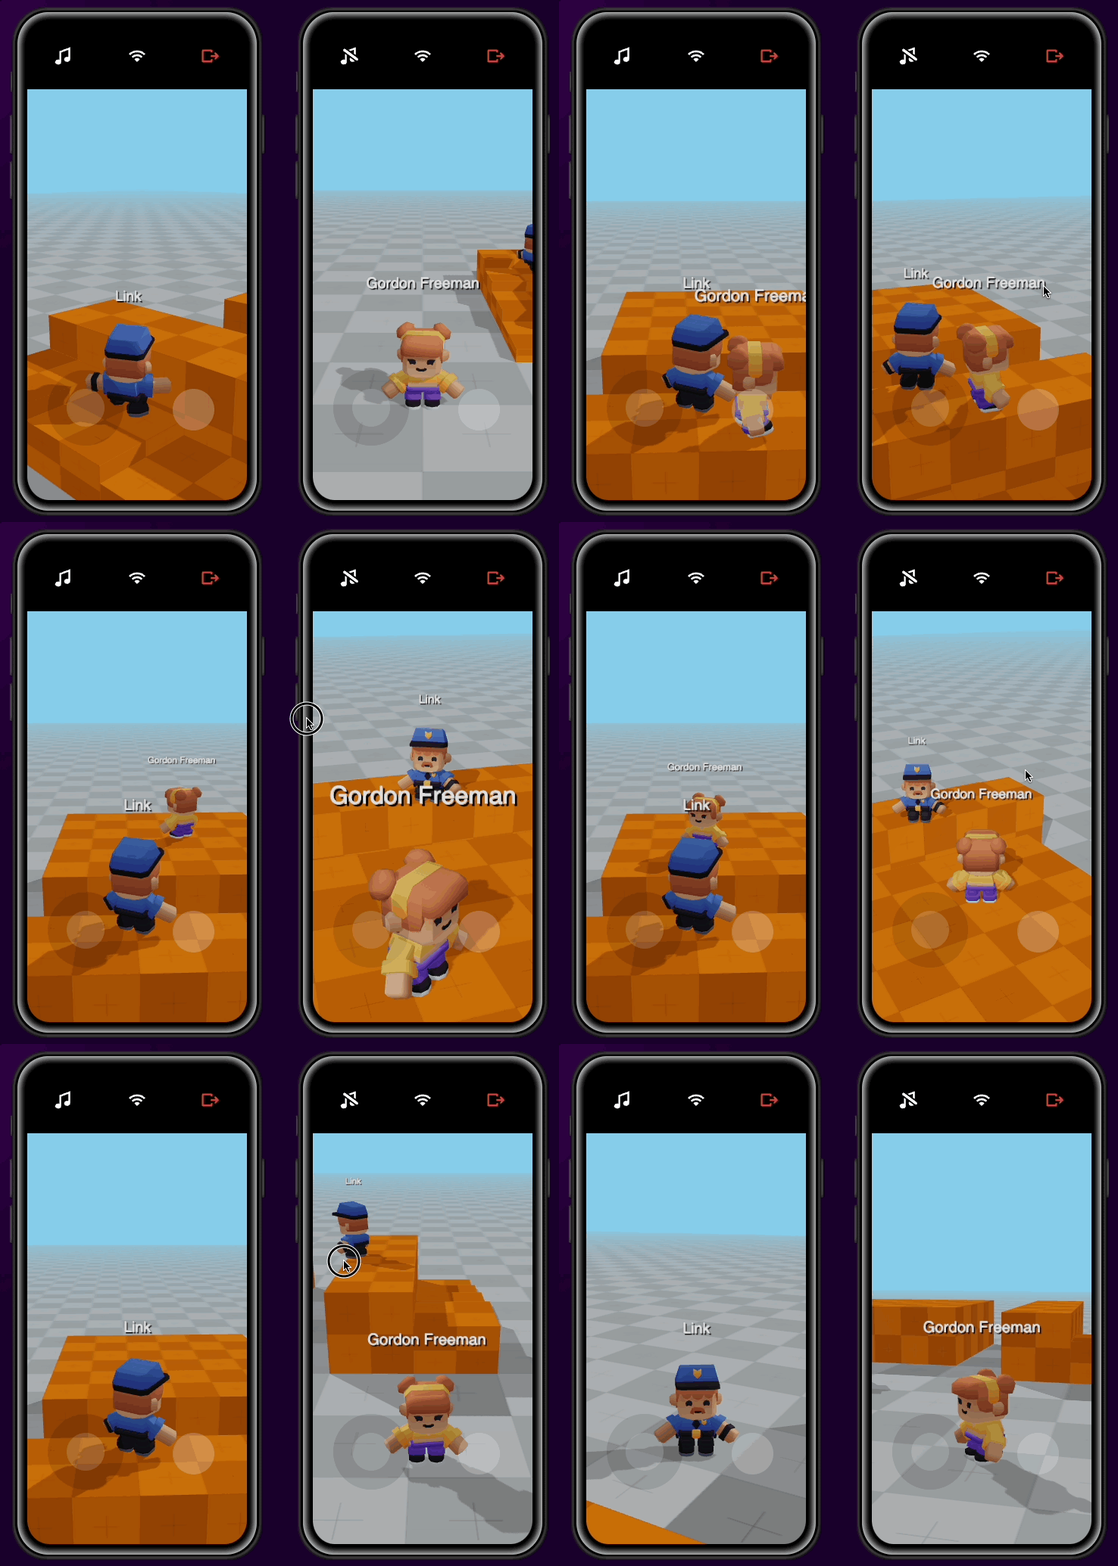
At Rune, we love all types of games—from 2D to isometric to 3D—and we want you to build with the tools you prefer on our platform. Creating 3D games introduces some extra pieces, like camera controls and character movement, which takes time to make feel natural, even in single-player settings. The examples below serve as a straightforward reference for building 3D games with Three.js on the Rune platform.

You can give the demo a play in the tech demos section of the docs.

Approach

Building a 3D game is more time consuming than a 2D game, though the multiplayer components remain essentially the same when using the Rune SDK. In this tech demo, we'll cover key aspects of building a multiplayer 3D game:

  • Rendering, shadows, and lighting
  • Model loading
  • Character and camera controllers
  • Input and virtual joystick
  • Multiplayer support with the Rune SDK

We’ll follow a similar approach to previous tech demos, where player inputs are exchanged between the client and logic layers. The logic layer manages all updates to the game world, including collisions. On the client side, we ensure our 3D world mirrors the logical world, interpolating between positions and rotations for smooth visuals.

With fantastic assets from Kenney.nl, we’ll build a small scene for players to explore together.

Rendering, Shadows, and Lighting

Setting Up the Renderer

Below is the configuration for a high-quality yet mobile-friendly Three.js renderer. Key configuration options include:

  • Power Preference - Maximizes graphics performance on mobile devices, though it can drain battery life more quickly. Adjust this if rendering frequency can be reduced.
  • Anti-aliasing - Smooths jagged edges in 3D rendering, significantly improving visual quality.
  • Tone Mapping - Adjusts color depth and shading. For vibrant colors, ACESFilmicToneMapping offers a rich, deep effect.
  • Shadows - Adds realism by enabling shadows, though it can be demanding on low-end devices. Shadows must be enabled separately for both meshes and lights.
// Main Three.js scene setup
const scene: Scene = new Scene()

// Renderer setup
const renderer = new WebGLRenderer({
powerPreference: "high-performance",
antialias: true,
})

// Configure tone mapping and shadow rendering
renderer.toneMapping = ACESFilmicToneMapping
renderer.shadowMap.enabled = true
renderer.shadowMap.type = PCFShadowMap

// Add renderer to the DOM
renderer.setSize(window.innerWidth, window.innerHeight)
document.body.appendChild(renderer.domElement)

// Set background color and add fog for depth
const skyBlue = 0x87ceeb
scene.background = new Color(skyBlue)
scene.fog = new FogExp2(skyBlue, 0.02)

// Render the scene at configured FPS
setInterval(() => {
render()
}, 1000 / RENDER_FPS)

This setup creates a DOM element (canvas) for the renderer and attaches it to the document. We set a sky-blue background with fog to add depth and enhance visual appeal.

We use a setInterval loop at 30 FPS, though requestAnimationFrame() could be used for a higher frame rate. To optimize performance on low-end devices, we cap it at 30 FPS.

The render function updates game elements as follows:

// Update different game elements
updateInput()
const localPlayer = getLocalCharacter3D()
if (localPlayer) {
getShadowingLightGroup().position.x = localPlayer.model.position.x
getShadowingLightGroup().position.z = localPlayer.model.position.z

updateCamera(localPlayer)
}
updateCharacterPerFrame(1 / RENDER_FPS)

// Render the game with Three.js
renderer.render(scene, getCamera())

The input, camera, lighting, and character updates shown here will be discussed later in this article.

Lights and Shadows

In addition to the renderer, we need to light the scene and enable shadows. Three.js includes built-in shadow mapping, which we configure below.

  • Ambient Light - Provides basic visibility across the scene but doesn’t add shading.
  • Directional Light - Illuminates models from a specific direction, adding shading; it also serves as the source of shadows.
// Basic ambient lighting for visibility
ambientLight = new AmbientLight(0xffffff, 1)
getScene().add(ambientLight)

// Create directional light for shadows
lightGroup = new Object3D()
directionalLight = new DirectionalLight(0xffffff, 1)
directionalLight.position.set(-3, 3, 3)
lightGroup.add(directionalLight)
lightGroup.add(directionalLight.target)
getScene().add(lightGroup)

directionalLight.castShadow = true
directionalLight.shadow.mapSize.width = SHADOW_MAP_SIZE
directionalLight.shadow.mapSize.height = SHADOW_MAP_SIZE
directionalLight.shadow.camera.near = SHADOW_MAP_NEAR_PLANE
directionalLight.shadow.camera.far = SHADOW_MAP_FAR_PLANE
directionalLight.shadow.camera.left = -SHADOW_MAP_BOUNDS
directionalLight.shadow.camera.right = SHADOW_MAP_BOUNDS
directionalLight.shadow.camera.top = SHADOW_MAP_BOUNDS
directionalLight.shadow.camera.bottom = -SHADOW_MAP_BOUNDS

We configure the shadow generator’s frustum to control the extent of the shadows. Shadow mapping renders the scene from the light’s perspective, creating a texture to display shadows. By moving the directional light with the player, shadows are rendered only locally, optimizing performance.

Model Loading

Three.js simplifies model loading, especially when using Kenney’s GLTF models. Here’s a loader function for GLTF models:

function loadGLTF(url: string): Promise<GLTF> {
console.log("Loading: ", url)

return new Promise<GLTF>((resolve, reject) => {
gltfLoader.load(
url,
(model) => {
model.scene.traverse((child) => {
child.castShadow = true
child.receiveShadow = true
})
resolve(model)
},
undefined,
(e) => {
reject(e)
}
)
})
}

To ensure all models can cast and receive shadows, we traverse each loaded model. If textures aren’t automatically loaded, we apply them manually as shown below.

export function loadTexture(url: string): Promise<Texture> {
return new Promise<Texture>((resolve, reject) => {
textureLoader.load(
url,
(texture) => {
texture.colorSpace = SRGBColorSpace
resolve(texture)
},
undefined,
(e) => {
reject(e)
}
)
})
}

export function applyTexture(obj: Object3D, texture: Texture) {
obj.traverse((node) => {
if (node instanceof Mesh) {
node.material = new MeshLambertMaterial({ map: texture })
}
})
}

Character and Camera Controller

Creating a responsive 3D character and camera controller can be an intricate task. For instance, our recent release, MeatSuits, features a controller inspired by Roblox. This demo distills the basics of that controller.

First, we set up a basic perspective camera:

const lookAt: Vector3 = new Vector3(0, 1, 0)
let targetAngleY: number = 0
let targetAngleZ: number = Math.PI

const camera: PerspectiveCamera = new PerspectiveCamera(
45,
window.innerWidth / window.innerHeight,
0.1,
150
)

We then update the camera’s position and target each frame to ensure smooth motion:

export function updateCamera(targetCharacter: Character3D) {
const cameraHeight = 2
const cameraDistance = 4
const cameraSoftness = 0.2
const cameraTargetHeight = 1

const { x, y, z } = targetCharacter.model.position

const targetPosition = new Vector3(cameraDistance, 0, 0)
targetPosition.applyEuler(new Euler(0, -targetAngleY, -targetAngleZ))
targetPosition.add(new Vector3(x, y + cameraHeight, z))

camera.position.lerp(targetPosition, cameraSoftness)
lookAt.lerp(new Vector3(x, y + cameraTargetHeight, z), cameraSoftness)
camera.lookAt(lookAt)
}

It’s simple, right? The real trick with the Roblox-style controller is that joystick movement is interpreted based on the camera’s current viewpoint. So pushing up on the joystick always moves forward in the view, and pushing left always moves left relative to the camera.

But how do we turn corners, then? As we’ll see in the input section below, there’s a subtle tweak to the rules applied on the client side.

Input and Virtual Joystick

While the demo may seem to use only a couple of inputs, there are actually several elements that make the controller feel "right." First is the camera view adjustment—this allows players to drag the view using a second finger (separate from joystick control). For us, this is configured in the renderer code:

renderer.domElement.addEventListener("touchstart", (e) => {
mouseX = e.targetTouches[0].clientX
mouseY = e.targetTouches[0].clientY
mouseDown = true
})
renderer.domElement.addEventListener("touchend", () => {
mouseDown = false
})
renderer.domElement.addEventListener("touchmove", (e) => {
if (mouseDown) {
const dx = e.targetTouches[0].clientX - mouseX
const dy = e.targetTouches[0].clientY - mouseY
mouseX = e.targetTouches[0].clientX
mouseY = e.targetTouches[0].clientY

rotateCameraZ(dy * 0.01)
rotateCameraY(dx * 0.01)
}
})

Pretty simple, right? Dragging a finger on the renderer’s background adjusts the camera rotation.

Next, we handle the "real" input through the joystick and jump button, retrieving the joystick state (and following key presses if testing on the web):

const joystickState = getJoystickState()
const currentControls: Controls = {
x: 0,
y: 0,
cameraAngle: getCameraAngle(),
jump: isKeyDown(" ") || jump,
}

// generate controls to send to the server
if (isKeyDown("a") || joystickState.x < -DEAD_ZONE) {
currentControls.x = isKeyDown("a") ? -1 : joystickState.x
}
if (isKeyDown("d") || joystickState.x > DEAD_ZONE) {
currentControls.x = isKeyDown("d") ? 1 : joystickState.x
}
if (isKeyDown("w") || joystickState.y > DEAD_ZONE) {
currentControls.y = isKeyDown("w") ? 1 : joystickState.y
}
if (isKeyDown("s") || joystickState.y < -DEAD_ZONE) {
currentControls.y = isKeyDown("s") ? -1 : joystickState.y
}

Note that we’re also recording the current cameraAngle as part of the controls. This allows the movement code in the logic (see below) to interpret the inputs correctly.

Next, we add a small tweak that lets us turn corners. When moving left or right, we move perpendicular to the camera angle, but we also gently turn the camera along with the movement:

// if the controls indicate left/right motion then rotate the camera
// slightly to follow the turn
if (currentControls.x < 0) {
rotateCameraY(-CAMERA_ROTATE * (Math.abs(currentControls.x) - DEAD_ZONE))
}
if (currentControls.x > 0) {
rotateCameraY(CAMERA_ROTATE * (Math.abs(currentControls.x) - DEAD_ZONE))
}

This means that if the player is running left or right, the camera tries to turn to follow them. If they keep moving in those directions, they’ll eventually run in a circle since movement is relative to the camera angle.

Once we have the controls for this frame, we need to update the logic accordingly. Rune prevents network flooding by allowing only 10 updates per second, so we avoid sending updates too frequently or when control inputs haven’t changed:

// only send the control update if something has changed
if (
lastSentControls.x !== currentControls.x ||
lastSentControls.y !== currentControls.y ||
lastSentControls.cameraAngle !== currentControls.cameraAngle ||
lastSentControls.jump !== currentControls.jump
) {
// only send the control update if we haven't sent one recent, or if:
//
// * We've stopped
// * We've jumped
//
// Need to do those one's promptly to make it feel like the player
// has direct control
if (
Date.now() - lastSentTime > CONTROLS_SEND_INTERVAL ||
currentControls.jump || // send jump instantly
(currentControls.x === 0 &&
currentControls.y === 0 &&
(lastSentControls.x !== 0 || lastSentControls.y !== 0))
) {
Rune.actions.update(currentControls)
lastSentControls = currentControls
lastSentTime = Date.now()
jump = false
}
}

However, if we stop moving or jump, we want to send that input immediately—this ensures the player feels direct control over their character. Any delay in stopping would make the player feel "lag".

Now we have input, models, a renderer, lighting, and shadows! All that’s left is to make the demo multiplayer.

Multiplayer Support

Let’s start by looking at the client code. As we’ve seen in previous tech demos, there’s a callback that Rune uses to notify us of game state updates: onChange:

Rune.initClient({
onChange: ({ game, yourPlayerId }) => {
// build the game map if we haven't already
buildGameMap(game.map)

for (const char of game.characters) {
// theres a new character we haven't got in out scene
if (!getCharacter3D(char.id)) {
const char3D = createCharacter3D(char)
if (char.id === yourPlayerId) {
localPlayerCharacter = char3D
}
}

// update the character based on the logic state
updateCharacter3DFromLogic(char)
}
for (const id of getCurrentCharacterIds()) {
// one of the scene characters has been removed
if (!game.characters.find((c) => c.id === id)) {
removeCharacter3D(id)
}
}
},
})

That’s all of our onChange code. Here’s how we apply it:

  • Build the game map if we haven’t already (see below)
  • Ensure any characters defined in the logic have a 3D model in our world
  • Update any models in our world based on the logic state
  • Remove any models in our world that don’t exist in the logic

On the logic side, we have a bit more to consider. Our game state is lightweight, containing the player’s input, the game world, and the character moving within it:

// the game state we store for the running game
export interface GameState {
// the gamp map for collisions etc
map: GameMap
// the controls reported for each player
controls: Record<PlayerId, Controls>
// the characters in the game world
characters: Character[]
}

When we start up, we add a character to the world for each player:

setup: (allPlayerIds) => {
const state: GameState = {
map: createGameMap(),
controls: {},
characters: [],
}

// create a character for each player
for (const id of allPlayerIds) {
addCharacter(id, state)
}
return state
},

Similarly, when players join or leave, we simply update the characters in the world:

events: {
playerLeft: (playerId, { game }) => {
// remove the character that represents the player that left
game.characters = game.characters.filter((c) => c.id !== playerId)
},
playerJoined: (playerId, { game }) => {
// someone joined, add a new character for them
addCharacter(playerId, game)
},
},

In the logic's update() loop, we move the characters around the world based on their inputs. The key detail here is that the player's inputs are interpreted relative to their camera angle:

// if the player is trying to move then apply the movement assuming its not blocked
if (controls && (controls.x !== 0 || controls.y !== 0) && character) {
// work out where the player would move to
const newPos = getNewPositionAndAngle(controls, character.position)
// check the height at that location
const height = findHeightAt(game, newPos.pos.x, newPos.pos.z)
const step = height - character.position.y
// if we can step up the height or its beneath us then move the player
if (step < MAX_STEP_UP) {
// not blocked
if (step > 0) {
// stepping up
character.position.y = height
}
character.position.x = newPos.pos.x
character.position.z = newPos.pos.z
// record the speed so the client side know hows quickly to interpolate
character.lastMovementSpeed =
Math.sqrt(controls.x * controls.x + controls.y * controls.y) *
MOVE_SPEED
}
character.angle = newPos.angle
} else if (character) {
character.lastMovementSpeed = 0
}

We’ll cover the map height calculations in the next section, but the key function here is getNewPositionAndAngle(). This function takes the player’s input and determines the new position and angle relative to the player’s camera angle:

export function getNewPositionAndAngle(
controls: Controls,
pos: Vec3
): { pos: Vec3; angle: number } {
const dir = getDirectionFromAngle(controls.cameraAngle)
const result = {
pos: { ...pos },
angle: 0,
}
result.angle = -(controls.cameraAngle - Math.atan2(-controls.x, controls.y))
if (controls.x < 0) {
result.pos.x += dir.z * MOVE_SPEED_PER_FRAME * Math.abs(controls.x)
result.pos.z -= dir.x * MOVE_SPEED_PER_FRAME * Math.abs(controls.x)
}
if (controls.x > 0) {
result.pos.x -= dir.z * MOVE_SPEED_PER_FRAME * Math.abs(controls.x)
result.pos.z += dir.x * MOVE_SPEED_PER_FRAME * Math.abs(controls.x)
}
if (controls.y < 0) {
result.pos.x -= dir.x * MOVE_SPEED_PER_FRAME * Math.abs(controls.y)
result.pos.z -= dir.z * MOVE_SPEED_PER_FRAME * Math.abs(controls.y)
}
if (controls.y > 0) {
result.pos.x += dir.x * MOVE_SPEED_PER_FRAME * Math.abs(controls.y)
result.pos.z += dir.z * MOVE_SPEED_PER_FRAME * Math.abs(controls.y)
}
return result
}

This ensures that the player's controls are always relative to their camera’s direction, achieving the Roblox-style character controller we wanted.

Rendering the Map

What would the world be without a map to explore? In this tech demo, our map is a simple grid of heights that generates blocks for players to explore. Our game map definition is as follows:

// wrapper for the content of each tile - useful
// if we want to add color or other attributes later
export type GameMapElement = number
// the actual game map is an array of tiles. We only
// specify the height if its non-zero to keep the size down
export type GameMap = GameMapElement[]

Since the map is simply an array of 1x1 blocks, determining the height at any given location is highly efficient:

export function getHeightAt(map: GameMap, x: number, z: number) {
x = Math.floor(x)
z = Math.floor(z)
return map[x + z * GAME_MAP_WIDTH] ?? 0
}

This approach is useful because we’re using a fairly brute-force collision detection on the server. We determine the height at a player’s position by sampling around the player and selecting the maximum height. Each time the player attempts to move, we calculate the height at the new location and compare it to the player’s current height:

  • If it’s lower, the player needs to fall.
  • If it’s the same, there’s no change on the y-axis.
  • If it’s slightly higher, the player should step up onto the block.
  • If it’s significantly higher, the player can’t move to that location.

You can see this logic in the update() function, which calls our sampling function findHeightAt, as shown below:

function findHeightAt(game: GameState, x: number, z: number) {
let maxHeight = 0
const characterSize = 0.5
const step = characterSize / 5
for (
let xoffset = -characterSize / 2;
xoffset <= characterSize / 2;
xoffset += step
) {
for (
let zoffset = -characterSize / 2;
zoffset <= characterSize / 2;
zoffset += step
) {
maxHeight = Math.max(
maxHeight,
getHeightAt(game.map, x + xoffset, z + zoffset)
)
}
}

return maxHeight
}

Finally, we want to visualize the game map in the 3D world for players to explore. Since the game map is part of the game state, it’s also accessible to the client. At the start of the tech demo, we call buildGameMap():

export function buildGameMap(map: GameMap): void {
// cycle through any blocks that are defined and create
// a simple box with the wall texture at the right height
for (let x = 0; x < GAME_MAP_WIDTH; x++) {
for (let z = 0; z < GAME_MAP_HEIGHT; z++) {
const height = getHeightAt(map, x, z)
if (height) {
const geometry = new BoxGeometry(1, 1, 1)
const material = new MeshLambertMaterial({ map: wallTexture })
const cube = new Mesh(geometry, material)
cube.castShadow = true
cube.receiveShadow = true
cube.scale.y = height
cube.position.x = x + 0.5
cube.position.y = height / 2
cube.position.z = z + 0.5
getScene().add(cube)
}
}
}
}

As you can see, we cycle through the locations with a defined height and create a textured box to represent each height level. This provides players with a bare-bones world to navigate.

With Three.js, building a 3D game is accessible for any web developer. Adding multiplayer with the Rune SDK is also straightforward. Hopefully, the code in this tech demo covers most cases where a game needs a well-rendered 3D world and familiar controls as a foundation for something exciting!

Looking forward to seeing the 3D games you build on Rune!

Want to learn more? Join us on Discord for a chat!

Subscribe to our newsletter for more game dev blog posts
We'll share your email with Substack
Substack's embed form isn't very pretty, so we made our own. But we need to let you know we'll subscribe you on your behalf. Thanks in advance!

· 9 min read
Kevin Glass

At Rune, we want you to be able to use game development tools that you love with our platform. With this in mind, we’ve adapted the tutorial game from the popular framework Phaser to be multiplayer on Rune.

Approach

Phaser is wonderfully powerful as a game library, and one of its key concepts is putting everything into the scene graph. This is fantastic for a single player game since the physics/collision can happen on the client side where the scene graph lives. However, when you approach multiplayer (with any framework) the game needs to be able to run its physics both on clients and validating server. With this in mind in this tech demo we’ll move the physics into the logic of the game and use a separate library to manage it.

Outside of this the Phaser framework can be used as normal.

Client Side

To anyone who's used Phaser before this will look pretty familiar. For those who haven't this is setting up a Phaser runtime and renderer and loading the assets that will be used to render the game:

export default class TutorialGame extends Phaser.Scene {
preload() {
// preload our assets with phaser
this.load.image("sky", "assets/sky.png")
this.load.image("ground", "assets/platform.png")
this.load.image("star", "assets/star.png")
this.load.image("bomb", "assets/bomb.png")
this.load.spritesheet("dude", "assets/dude.png", {
frameWidth: 32,
frameHeight: 48,
})
}
}

const config = {
type: Phaser.AUTO,
width: window.innerWidth,
height: window.innerHeight,
scene: TutorialGame,
scale: {
mode: Phaser.Scale.ScaleModes.FIT,
},
}

new Phaser.Game(config)

Here's the first difference to a normal Phaser application. Since we're going to be using Phaser for the rendering only (the physics will be happening in the game logic) we're going to add a mapping table that will convert physics object on the server to the client side scene graph elements:

  physicsToPhaser: Record<number, Phaser.GameObjects.Sprite> = {}
lastSentControls: Controls = {
left: false,
right: false,
up: false,
}

You can also see lastSentControls above. Since Phaser is providing the input from the player and we need to send that to the logic, we'll record the controls we sent last time. We want to avoid sending the controls more often than needed to avoid wasted networking communications by making sure we only send the inputs when they change.

Next up we have the Rune integration. We initialize the Rune SDK with a call back function that tells us when game state is changing. In this case this means when our physics objects have been created, updated or deleted. When we get this notification, we're going to scan through the state and update the Phaser rendering to match. First, we locate each physics body in the phaser world:

 // for all the bodies in the game, make sure the visual representation
// exists and is synchornized with the physics running in the game logic
for (const body of physics.allBodies(game.world)) {
const rect = body.shapes[0] as physics.Rectangle

const x = Math.ceil(
(body.center.x / PHYSICS_WIDTH) * window.innerWidth
)
const y = Math.ceil(
(body.center.y / PHYSICS_HEIGHT) * window.innerHeight
)
const width = Math.ceil(
(rect.width / PHYSICS_WIDTH) * window.innerWidth
)
const height = Math.ceil(
(rect.height / PHYSICS_HEIGHT) * window.innerHeight
)

let sprite = this.physicsToPhaser[body.id]

If we don't have a sprite for the body yet, we create the right one based on the type of body we've been given:

// if a sprite isn't already created, create one based on the type
// of body
if (!sprite) {
if (body.data && body.data.star) {
const size = Math.ceil(
(rect.bounds / PHYSICS_WIDTH) * window.innerWidth
)
sprite = this.physicsToPhaser[body.id] = this.add
.sprite(x, y, "star")
.setDisplaySize(size * 2, size * 2)
} else if (body.data && body.data.player) {
// create the player and associated animations
sprite = this.physicsToPhaser[body.id] = this.add
.sprite(x, y, "dude")
.setDisplaySize(width, height)

this.anims.create({
key: "left",
frames: this.anims.generateFrameNumbers("dude", {
start: 0,
end: 3,
}),
frameRate: 10,
repeat: -1,
})

this.anims.create({
key: "turn",
frames: [{ key: "dude", frame: 4 }],
frameRate: 20,
})

this.anims.create({
key: "right",
frames: this.anims.generateFrameNumbers("dude", {
start: 5,
end: 8,
}),
frameRate: 10,
repeat: -1,
})
} else {
sprite = this.physicsToPhaser[body.id] = this.add
.sprite(x, y, "ground")
.setDisplaySize(width, height)
}
}

Finally, once the sprite is definitely in the world we update it to match the body position based on what the logic has given us:

// update the sprites position and if its a player the animation
sprite.x = x
sprite.y = y
if (body.data?.player) {
const controls = game.controls[body.data?.playerId ?? ""]
if (controls) {
if (controls.left) {
sprite.anims.play("left", true)
} else if (controls.right) {
sprite.anims.play("right", true)
} else {
sprite.anims.play("turn", true)
}
}
}

The final step is pass the input from the phaser side into the logic so we can update the physics model. First we record the input, we have on screen controls which we can listen to:

const left = document.getElementById("left") as HTMLImageElement
const right = document.getElementById("right") as HTMLImageElement
const jump = document.getElementById("jump") as HTMLImageElement

left.addEventListener("touchstart", () => {
gameInputs.left = true
})
right.addEventListener("touchstart", () => {
gameInputs.right = true
})
left.addEventListener("touchend", () => {
gameInputs.left = false
})
right.addEventListener("touchend", () => {
gameInputs.right = false
})
jump.addEventListener("touchstart", () => {
gameInputs.up = true
})
jump.addEventListener("touchend", () => {
gameInputs.up = false
})

Then in the Phaser update if the inputs have changed, we pass them to our logic through a Rune action:

update() {
// As with the physics we don't want the controls to be processed directly in the
// the client code. Instead we want to schedule an action immediately that will update
// the game logic (and in turn the physics engine) with the new state of the player's
// controls.
const stateLeft = gameInputs.left
const stateRight = gameInputs.right
const stateUp = gameInputs.up

if (
this.lastSentControls.left !== stateLeft ||
this.lastSentControls.right !== stateRight ||
this.lastSentControls.up !== stateUp
) {
this.lastSentControls = {
left: stateLeft,
right: stateRight,
up: stateUp,
}
Rune.actions.controls(this.lastSentControls)
}
}

And that's our client done!

Logic Side

On the logic side, we're going to maintain a propel-js physics models that represents our world in the game state. We'll update this each loop and that state will be passed back to the Phaser client to render.

First, we'll setup some game state containing the physical world and state of each players controls, essentially what we need to update the world.

export const PHYSICS_WIDTH = 480
export const PHYSICS_HEIGHT = 800

export interface GameState {
world: physics.World
controls: Record<PlayerId, Controls>
}

export type Controls = {
left: boolean
right: boolean
up: boolean
}

type GameActions = {
controls: (controls: Controls) => void
}

declare global {
const Rune: RuneClient<GameState, GameActions>
}

Next we'll initialize the Rune SDK and configure the world to have our players, platforms and stars:

Rune.initLogic({
minPlayers: 1,
maxPlayers: 4,
setup: (allPlayerIds) => {
const initialState: GameState = {
world: physics.createWorld({ x: 0, y: 800 }),
controls: {},
}

// phasers setup world but in propel-js physics
physics.addBody(
initialState.world,
physics.createRectangle(
initialState.world,
{ x: 0 * PHYSICS_WIDTH, y: 0.2 * PHYSICS_HEIGHT },
0.5 * PHYSICS_WIDTH,
0.05 * PHYSICS_HEIGHT,
0,
1,
1
)
)
physics.addBody(
initialState.world,
physics.createRectangle(
initialState.world,
{ x: 0.75 * PHYSICS_WIDTH, y: 0.4 * PHYSICS_HEIGHT },
0.5 * PHYSICS_WIDTH,
0.05 * PHYSICS_HEIGHT,
0,
1,
1
)
)
physics.addBody(
initialState.world,
physics.createRectangle(
initialState.world,
{ x: 0.5 * PHYSICS_WIDTH, y: 0.6 * PHYSICS_HEIGHT },
0.5 * PHYSICS_WIDTH,
0.05 * PHYSICS_HEIGHT,
0,
1,
1
)
)
physics.addBody(
initialState.world,
physics.createRectangle(
initialState.world,
{ x: 0.5 * PHYSICS_WIDTH, y: 0.9 * PHYSICS_HEIGHT },
1 * PHYSICS_WIDTH,
0.3 * PHYSICS_HEIGHT,
0,
1,
1
)
)

// create a player body for each player in the game
for (const playerId of allPlayerIds) {
const rect = physics.createRectangleShape(
initialState.world,
{ x: 0.5 * PHYSICS_WIDTH, y: 0.5 * PHYSICS_HEIGHT },
0.1 * PHYSICS_WIDTH,
0.1 * PHYSICS_HEIGHT
)
const footSensor = physics.createRectangleShape(
initialState.world,
{ x: 0.5 * PHYSICS_WIDTH, y: 0.55 * PHYSICS_HEIGHT },
0.05 * PHYSICS_WIDTH,
0.005 * PHYSICS_HEIGHT,
0,
true
)
const player = physics.createRigidBody(
initialState.world,
{ x: 0.5 * PHYSICS_WIDTH, y: 0.5 * PHYSICS_HEIGHT },
1,
0,
0,
[rect, footSensor]
) as physics.DynamicRigidBody
player.fixedRotation = true
player.data = { player: true, playerId }
physics.addBody(initialState.world, player)

initialState.controls[playerId] = {
left: false,
right: false,
up: false,
}
}

// create a few stars to play with
for (let i = 0; i < 5; i++) {
const rect = physics.createCircleShape(
initialState.world,
{ x: i * 0.2 * PHYSICS_WIDTH, y: 0.15 * PHYSICS_HEIGHT },
0.04 * PHYSICS_WIDTH
)
const star = physics.createRigidBody(
initialState.world,
{ x: i * 0.2 * PHYSICS_WIDTH, y: 0.15 * PHYSICS_HEIGHT },
10,
1,
1,
[rect],
{ star: true }
) as physics.DynamicRigidBody
physics.addBody(initialState.world, star)
}

return initialState
}

As seen above, for each body, we set user data indicating the type of body it should be rendered as. This game state will immediately be sent back to our client, which will create sprites in the Phaser scene graph and position them accordingly..

Next, we need to process the input action we provided from the client. This is as simple updating our game state to know which controls a player is pressing:

actions: {
controls: (controls, { game, playerId }) => {
game.controls[playerId] = controls
},
},

The final step of our update loop is update the physics model based on the controls provided from the player clients:

update: ({ game, allPlayerIds }) => {
// each loop process the player inputs and adjust velocities of bodies accordingly
for (const playerId of allPlayerIds) {
const body = game.world.dynamicBodies.find(
(b) => b.data?.playerId === playerId
)
if (body) {
if (game.controls[playerId].left && !game.controls[playerId].right) {
body.velocity.x = -100
} else if (
game.controls[playerId].right &&
!game.controls[playerId].left
) {
body.velocity.x = 100
} else {
body.velocity.x = 0
}

// check if we're on the ground
if (body.shapes[1].sensorColliding) {
if (game.controls[playerId].up) {
body.velocity.y = -600
}
}
} else {
console.log("Body not found")
}
}

// propel-js likes a 60fps game loop since it keeps the iterations high so run it
// twice since the game logic is configured to run at 30fps
physics.worldStep(60, game.world)
}

Above we can see that we apply velocities directly to the bodies in propel-js based on the controls the player have provided. We're also using a foot sensor to determine if the player is on the ground and hence if they can jump. One other note here is a nuance of propel-js, our game logic is running at 30fps but the physics model works best at 60fps so we simply run two updates.

There you have it, a multiplayer version of the Phaser sample with the Rune SDK. It takes a little bit of rethinking of the model but we can make use of a lot of power of Phaser!

Want to know more? Why not drop by the Discord and have a chat?

Subscribe to our newsletter for more game dev blog posts
We'll share your email with Substack
Substack's embed form isn't very pretty, so we made our own. But we need to let you know we'll subscribe you on your behalf. Thanks in advance!

· 3 min read
Kevin Glass

When you’re building any client software, it’s useful to know what types of hardware your end users have – doubly so with experience-centric software like games. For the types of games I like to build, even the lowest-end desktop hardware has been more than enough for many years. However, for mobile game platforms like Rune, the types and power of devices that end users have can dramatically affect the player experience.

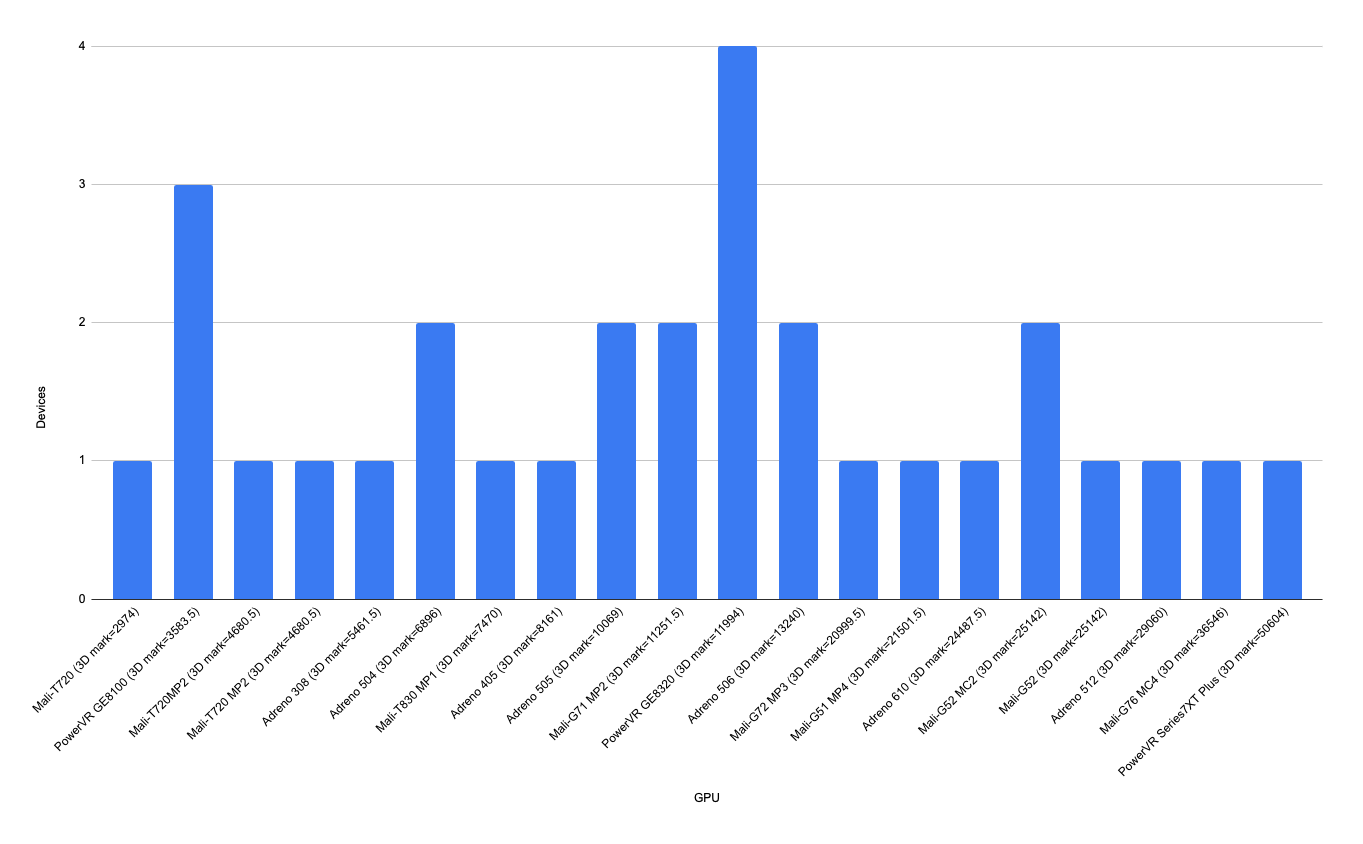
In this article, we’ll look at the types of devices and their capabilities found in the Rune user base. We’ve taken the top 30 most popular mobile devices on Rune (accounting for about 2 million users) and broken the data down by processor, GPU, screen size, memory, and release date.. As you can see below, in mobile game development, there’s still a huge range of capabilities to account for.

Screen Size

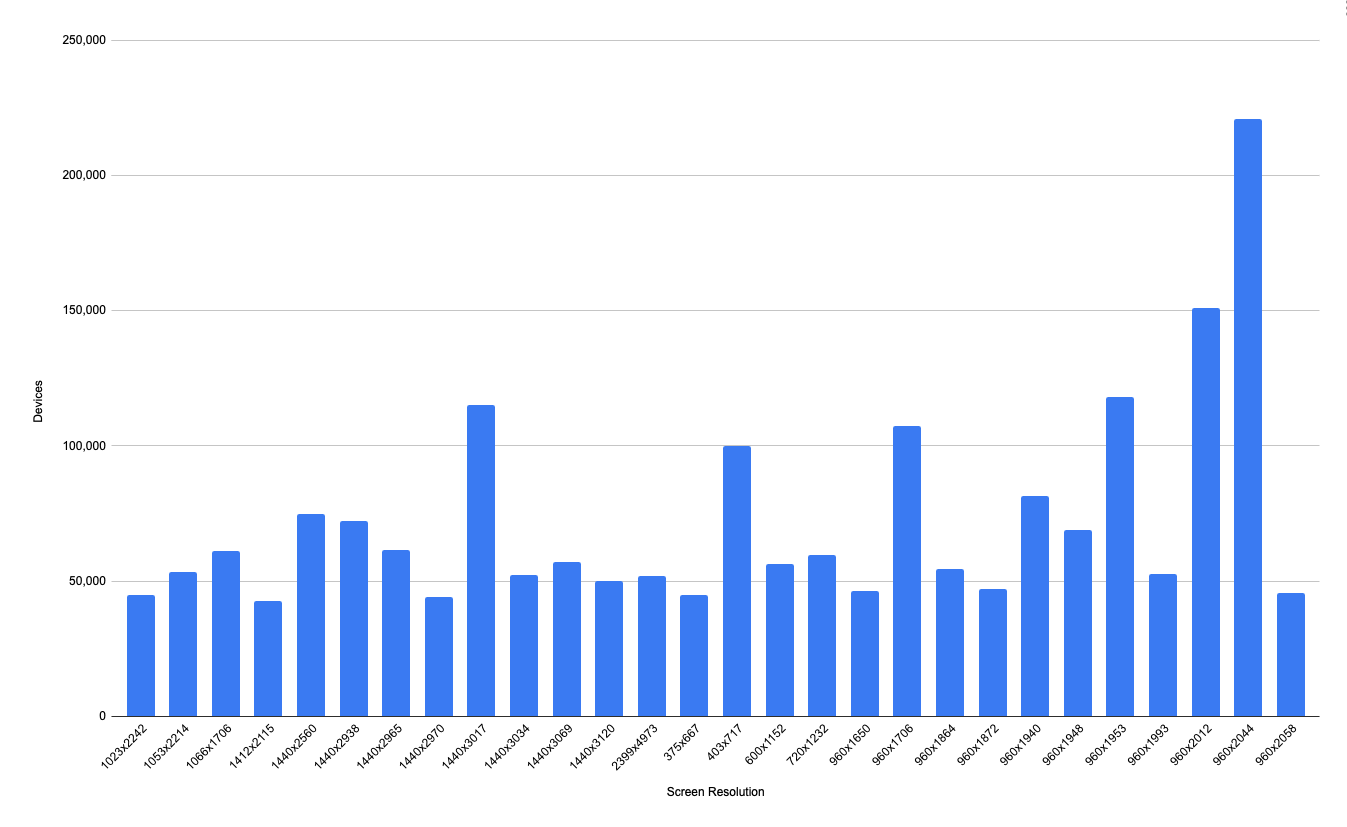
The graph above shows the screen resolutions in device-independent pixels. There’s a huge variety of screen sizes in use, going all the way down to significant numbers (40k) of users with screens as low as 375x667. Likewise, the top end has over 50k users with 2399x4973 screens. Responsive design is key.

Memory

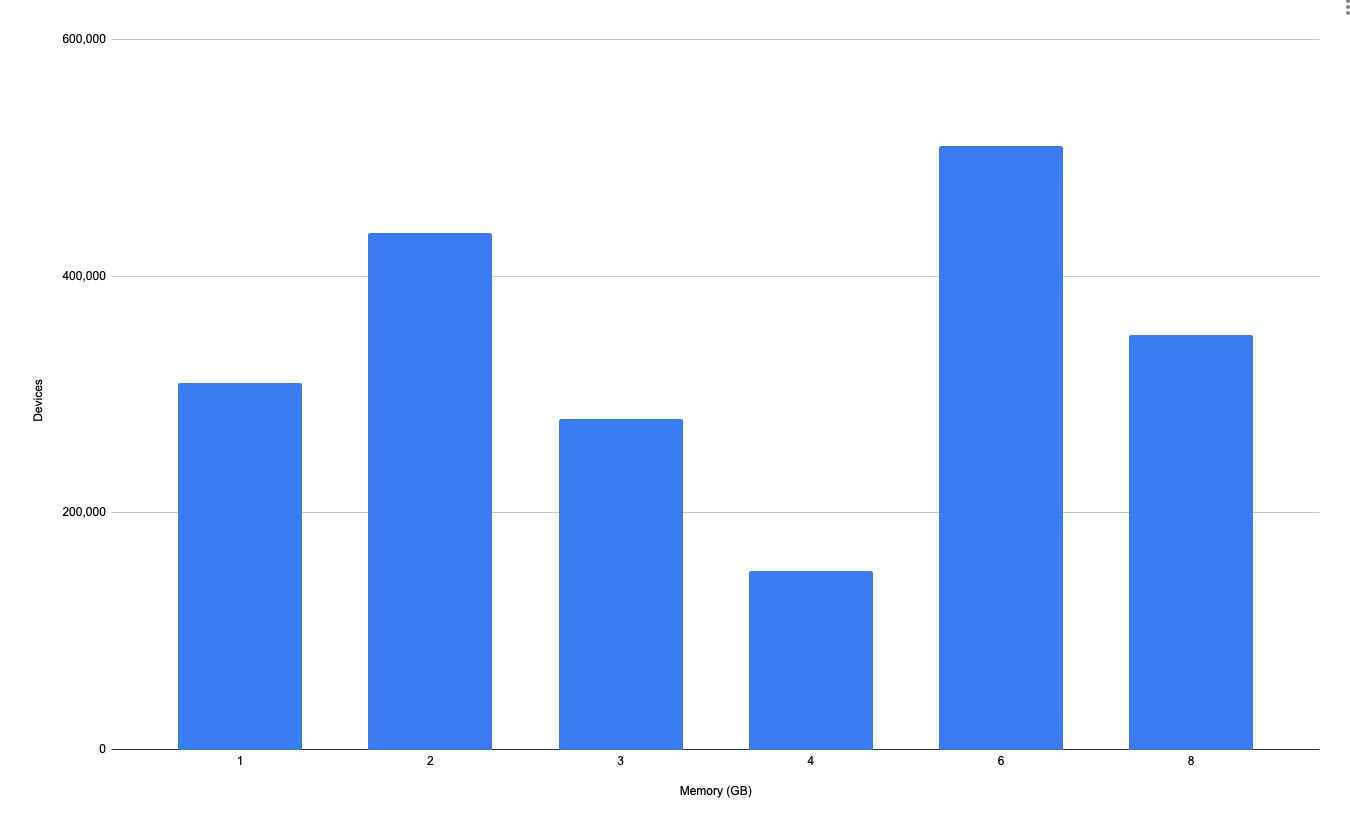
The spread of onboard memory is also wide, going as low as a single GB. The top end is quite low compared to very modern devices, maxing out at 8 GB. This, of course, is only in the top 30 devices in a much bigger user base, but it gives you an idea of what the games need to run on.

Processor and Graphics

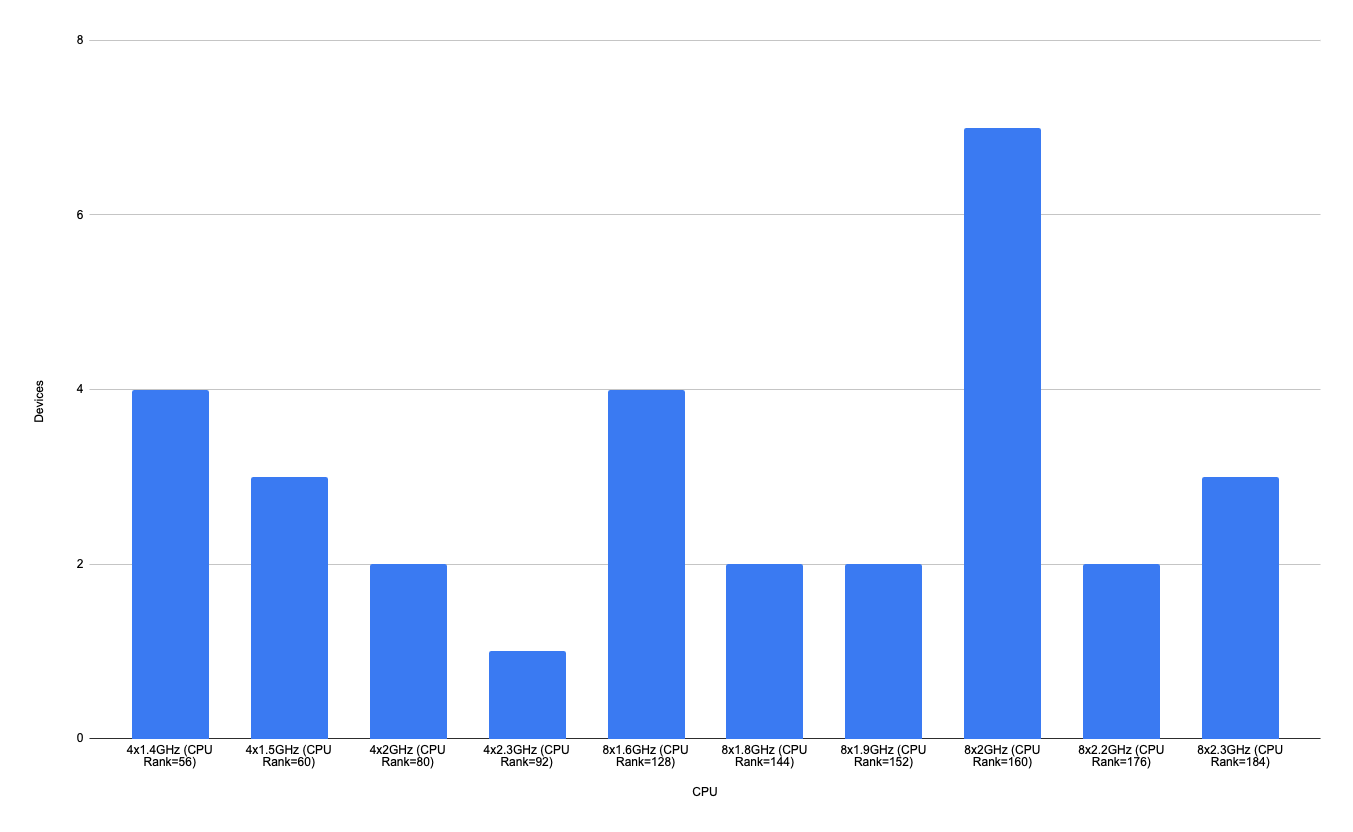
The following charts show the spread of CPUs and GPUs on the devices playing your games today.

Processor

Graphics

Analyzing the graphs above, we can see there are essentially two types of devices being used:

  • Octa-core CPU, Mali/PowerVR GPU class devices. These are reasonably powerful and will cope with most Rune games very well.
  • Quad-core CPU, Adreno GPU class devices. These are the budget devices that we see so many in Gen Z having due to the lower cost. These are the ones that you need to target to get maximum playtime for your games.

Release Year

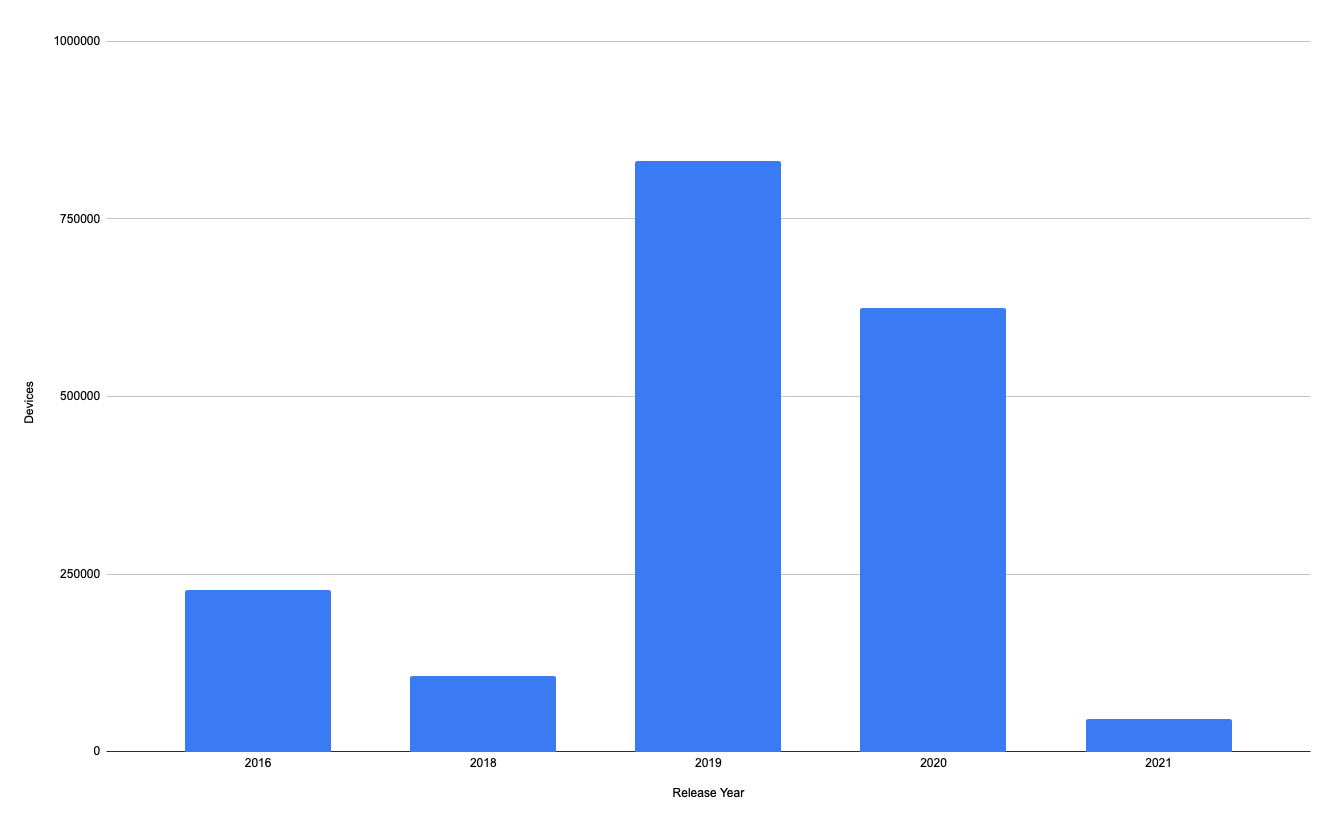
One final piece of information: the release year of the devices in the top 30.

This explains the other data: the majority of devices in the top 30 are 4–5 years old.

Hopefully, the data here will help focus and tailor your game development efforts to get the maximum playtime from our player base.

Does this align with what you’ve seen? Want to know more? Why not drop by the Discord and have a chat?

Subscribe to our newsletter for more game dev blog posts
We'll share your email with Substack
Substack's embed form isn't very pretty, so we made our own. But we need to let you know we'll subscribe you on your behalf. Thanks in advance!

· 4 min read
Kevin Glass

At Rune, the majority of the games on the platform are multiplayer. This is largely because we provide an SDK that enables JavaScript developers to build multiplayer experiences very easily, and our player base has come to expect it. Of course, as mentioned in Modern Game Networking Models, this means we focus on making the backend networking something special.

There are a lot of ways of making games multiplayer, from hot seat to shared screen and of course networking itself. Even in networking, there are multiple models to choose from each of which is suitable for a different type of game or programming complexity.

If you’re building a network layer for a single game or a bunch of very similar games then choosing the network model that’s the easiest and satisfies those game constraints is the best move.

However, at Rune, we’re pretty opinionated about a single model that works for all cases, predict-rollback. We need to provide a single common framework for all the games on Rune and so we focus on one networking model that supports the massive variety of games on the platform.

Predict-Rollback

In Modern Game Networking Models we talked in a bit of detail about how predict-rollback works. In summary, we essentially let all clients continue moving forward predicting the current game state based on the inputs they know about. If another client provides a new input (via the authoritative server) that occurs before the game time the current client is at, we roll-back the game state, apply the input, and then re-predict the current state.

So why do we think predict-rollback is the future of networking games and the best fit for a generic networking framework?

  • Some great games have used it to provide excellent multiplayer experiences, like Rocket League and Street Fighter. They also do an amazing job of hiding the rollback/changes when they occur.
  • It works for all cases, whether it's turn-based, RTS, or faster-paced twitch games; predict-rollback provides a stable, consistent approach. Even in turn-based games, where there should be no rollbacks, the simple simulation modified by inputs approach still fits the bill.
  • There’s growing library and platform support. Unity, Godot, and even Valve’s Source engines all have plugins that support this model.

What’s so great about the model then?

  • Low bandwidth—you only need to send the initial state and changes to that state. That’s pretty powerful right there. The variance in networks especially with the emerging nations becoming a huge consumer of games means this is super important.
  • Best player experience—in many cases, it means that clients can run forward without latency between player input and response. Of course, you need to deal with conflicts when they occur, but this seems to be much easier than the alternatives.
  • Most consistent implementation—once you’ve got determinism handled, it’s the most consistent approach across platforms and devices.. Every device acts the same and gets the same results.

What are the downsides? The process of rolling back and re-calculating the game state can be CPU heavy. Depending on your approach you may have to calculate many frames of change quickly based on the new input. However, this is why it’s now the right choice. Devices have reached a point where CPUs are extremely overpowered for what they’re trying to achieve in games - so there’s room to have a smart and utility based network model.

Of course, if you’re building a network model for a specific game, there are many tricks and game-specific approaches you could take.

If, however, you're building a library/framework that supports many types of games in many different environments and on different devices, predict-rollback is the right choice for now and the future.

Want to learn more about our approach or simply want to discuss the content of this article? Stop by our Discord and let’s chat!

Subscribe to our newsletter for more game dev blog posts
We'll share your email with Substack
Substack's embed form isn't very pretty, so we made our own. But we need to let you know we'll subscribe you on your behalf. Thanks in advance!

· 2 min read
Amani Albrecht

Hey everyone! 🎉

The energy around our very first Rune Jam has been so incredibly positive, welcoming and and uplifting, and we’re thrilled to finally announce the winners of this creative extravaganza!

For 10 whole days, you devs crafted away, the theme of "Creativity," and the results were nothing short of spectacular. Now, let's celebrate the winners who captivated gamers the most:

🥇 First Place: Tonai with Scribble - 14,630 minutes

  • Our top game is writing home with a Rune merch bundle featuring a stylish t-shirt, a cool hat, and a handy water bottle.

🥈 Second Place: PixelPincher with Chillville - 10,372 minutes

  • A fantastic hangout game deserving of a Rune t-shirt and hat.

🥉 Third Place: JumpArtifact with Triangle Artistry - 1,730 minutes

  • Rounding out our top three 📐 with a well-earned Rune t-shirt.

We cannot thank everyone enough for making Rune's 1st Jam an unforgettable event. Any game that didn't make the top 3 leader board still will receive some awesome Rune stickers as a token of our appreciate for your efforts and creativity.

While we celebrate the winning games, we truly believe that the Rune gamers were the real winners here. Every single one of these games were a ton of fun and the playtime hours are definitely a testament to that!

Stay tuned for more events like this, and keep pushing the boundaries of creativity! Happy developing, everyone! 🌟

Want to find out more? Why not stop by our Discord and let’s chat!

Subscribe to our newsletter for more game dev blog posts
We'll share your email with Substack
Substack's embed form isn't very pretty, so we made our own. But we need to let you know we'll subscribe you on your behalf. Thanks in advance!

· 7 min read
Kevin Glass

At Rune, we’ve got a platform that lets developers get their games out to millions of players on mobile devices across the world. With that number of players, you can imagine the device range is also wide. While Rune abstracts a lot of this complexity away, there are still a few things developers need to consider.

Cross-Platform Design

The most obvious area is the design of the visuals and fitting it to the various screen sizes out there. The range of screen sizes is shown below along with the different approaches you can take to deal with them.

Tiny UI

Probably the easiest approach is to simply make your UI tiny or limited in such a way that it’ll fit on any screen. This is often the most effective game visual design approach since it also encourages you to limit what's going on in terms of user interface - which leads to less reading, which is something the audience wants.

If you design for 360x600, you’re likely to be fine in 99% of cases. However, this does limit your creativity to this reasonably confined space. It also means players with larger screens won’t feel the benefit.

Responsive

With responsive design, the developer creates a UI that responds to the screen size available. This is very common in web and app design, but not so much in game design. A responsive design takes some thinking about; elements of the UI and game interface are described in terms of their proportion to each other. So, maybe the logo is 25% of the height of the screen and the start button is 10% – no matter the size of the screen, those elements will fill 30% of it.

For games, this can be hard since the elements of a game UI are often extremely richly styled – themed to fit the game. Unlike traditional web and mobile applications where the UI is reasonably simple, in an RPG the UI might be built out of intricate gold edging with scrolls filling in the background with complex textures. Making this scale up and down for different screen sizes automatically can be difficult.

Custom

For those developers with the time and inclination, we have the custom approach, and surprisingly, where many commercial games end up. The developer creates a code base that has different layouts and assets for different scenarios. Most common is the tablet/mobile split, where depending on the device, the UI is significantly different. However, this same approach can be applied to pure phone sizes by categorizing them:

  • nHD - around 640x360 pixels,
  • qHD - around 960x540 pixels
  • HD - around 1280x720 pixels
  • HD+ - around 1600x900 pixels

This gives us fixed targets for the custom code to work against. Pick the lowest one that’s less than or equal to the actual resolution and use that layout code.

Performance Characteristics

Here are some of the top devices and their specifications taken from over 10 million recorded devices on the Rune platform.

VendorModelCPUGPU
RedmiM2006C3LGOcta-core (4x2.0 GHz Cortex-A53 & 4x1.5 GHz Cortex-A53)PowerVR GE8320
SamsungSM-A107MOcta-core 2.0 GHz Cortex-A53PowerVR GE8320
RedmiM2004J19COcta-core (2x2.0 GHz Cortex-A75 & 6x1.8 GHz Cortex-A55)Mali-G52 MC2
RedmiM2006C3MNGOcta-core (4x2.3 GHz Cortex-A53 & 4x1.8 GHz Cortex-A53)PowerVR GE8320
SamsungSM-G532MQuad-core 1.4 GHz Cortex-A53Mali-T720MP2
AppleIPhone 7Quad-core 2.34 GHz (2x Hurricane + 2x Zephyr)PowerVR Series7XT Plus (six-core graphics)
SamsungSM-G610MOcta-core 1.6 GHz Cortex-A53Mali-T830 MP1
RedmiM2003J15SCOcta-core (2x2.0 GHz Cortex-A75 & 6x1.8 GHz Cortex-A55)Mali-G52 MC2
SamsungSM-A015MOcta-core (4x1.95 GHz Cortex-A53 & 4x1.45 GHz Cortex A53)Adreno 505
AppleIPhone 11Hexa-core (2x2.65 GHz Lightning + 4x1.8 GHz Thunder)Apple GPU (4-core graphics)

Even just looking at the top 10 or so, we can see a reasonably wide range of available hardware.

CPU

Mobile CPUs are getting faster all the time, but there are still plenty of low-specification devices out there. You also have to consider that the device will be running other applications at the same time as your game and if you’re using Rune, it’ll be used for a voice call as well.

It’s best to avoid CPU intensive loops making, sure your code does this in small sections over multiple rendering frames rather than attempting to process a lot of data in one go.

The pauses caused by CPU operations being locked up with a tight loop are the number one cause of player abandonment. That crazy button mashing when your phone seems to have stopped responding, resulting in the app/game eventually coming back but immediately closing. Users don’t like the feeling of their phone not working and so rarely open the application a second time to give it another chance.

GPU

Graphics chip usage is one of the most common causes of a very good game failing to spread across the mobile universe. Mobile graphics performance varies a great deal even from devices over the last 5 years. Your beautiful 3D game isn’t going to be so interesting for a player who is seeing it at one frame every three seconds while holding a phone that’s melting in their hand.

Keep it simple, especially 3D. Low-poly models don’t have to mean ugly. Multi-pass rendering should be used sparingly – a shadow pass is normally enough to make it feel real.

Also, it’s worth keeping in mind that the final game is going to be played on a 6.5-inch device; what you see on your monitor where it’s scaled up isn’t what will be visible to someone looking down at a tiny device. Avoid obsessing over the tiny detail you can see that no player ever will.

Physical Properties

One aspect that’s often overlooked with cross device games design is the physical aspects of the different devices.

First, we have the physical size of the design, especially when you’re thinking of two-handed controls on portrait games. What feels nice proportionally on a large device (8 inches or more) will often be uncomfortable to hold on a smaller device (around 6 inches). It’s worth finding items of the right size to test the feel of the controls (I use cardboard, cut and measured).

Second, “notches” – oh, how we hate them! Ever since the iPhone introduced the camera notch, web and game designers have despaired. Different devices now have different notches and notch sizes, meaning developers need to consider what’s called the “safe area.” As a game designer, of course, you want to fill the screen with the assets, so you both have to account for the notches but also avoid putting anything important there.

Luckily, if you’re writing games on Rune, it handles the safe area/notches for you leaving you with a clean rectangular area in which to put your game!

Making your game work well cross-platform and cross-device increases the number of potential players you have access to. In multiplayer games, it’s also key to make sure the experience is as similar as possible across devices to keep the game feeling “fair”.

If you have any questions or have anything to add, come join us on Discord.

Subscribe to our newsletter for more game dev blog posts
We'll share your email with Substack
Substack's embed form isn't very pretty, so we made our own. But we need to let you know we'll subscribe you on your behalf. Thanks in advance!

· 7 min read
Kevin Glass

I’ve built a few game servers over my career, including session-based mini games and an MMORPG. At Rune, that experience comes in handy as we’re building a game architecture that needs to support 10 million players. Getting the architecture right is key to having something scale in the long term.

There are lots of resources around the web on game server architecture, but it’s also worth noting that the requirements for gaming are very similar to voice/video conferencing (maybe that’s why WebRTC fits so well?) - so it’s worth checking out the architectural approaches there too.

The following are some of the issues and requirements to consider when building your own scalable multiplayer game architecture.

Matchmaker vs. Real-Time

Most games have some form of matchmaking, or working out the best pairing of players. Some games also have social and configuration type activities that don’t require player-to-player interaction. These are normally categorized as “matchmaking.” The requirements on latency in these scenarios are reasonably low. If a player is choosing a map or finding another set of players to compete with, a second or more response time is acceptable.

Once the players actually start playing the game, they immediately have a different set of requirements. In the “real-time” phase, player latency changes the game experience dramatically. It’s important that we’re optimizing for low latency on the network and high throughput on the server activities.

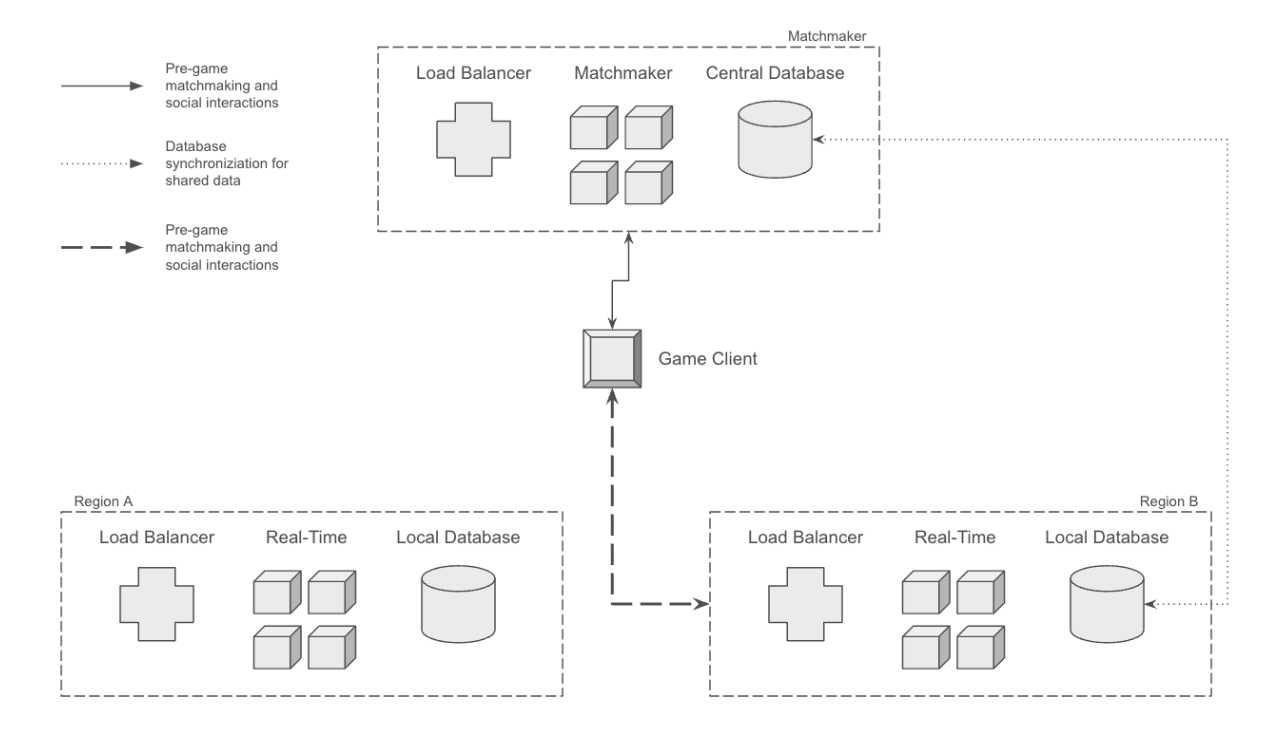
Since there are two different sets of requirements, it’s good practice to split these two scenarios into different components in the architecture. In the diagram above, we have the split between the central server - responsible for our matching type activities, and the real-time regional servers used for relaying in-game messages.

Regional Servers

As mentioned in Modern Game Networking Models, one of the first things to think about in any networked game is making sure that the connection between client and server is the best it can be.

Even if you assume everyone is on a great connection (something that isn’t true!), in the best case, network packets travel at the speed of light. If players are connecting from anywhere in the world, then the distances between a central server and the clients add up to significant latency.

To solve this, it’s ideal to introduce regional servers, that is, servers that are closer to clients. This limits the distance the packets have to travel and hence lowers the latency.

The downsides here are that running lots of servers is costly, and of course, if players want to play together from very distant locations, you have to choose one region for them to play on that might not be optimal for them.

Where players are a long distance from each other you have essentially two options:

  1. Pick a regional server that’s equally distant from both. This ensures they both get a similar network experience - although not optimal for either.
  2. Rely on backbone trunking. Connecting across the public internet can be slow for lots of reasons (e.g., poor cell/wifi, lots of network hops). The backbone fabric that your servers run on is often much faster. We can choose to have the players access a local regional server as an access point and then connect these regions via the faster backbone.

Load Balancing

Any scalable system needs to be able to add capacity through adding servers and this means load balancing. The split between matchmaking and real-time also changes how we do load balancing.

On the central server, the load balancing can act largely like a web application, that is, load balancing can be stateless and we rely on the database as the synchronization layer. If a player applies a change to their skin, the application can make a change, store it in the database and on the next invocation read it back from the database. There’s no running state that needs to be maintained between invocations.

However, on the real-time server, there will be several pieces of state:

  • The connections from the players themselves. As mentioned in WebRTC vs WebSocket, for high performance we want to establish and maintain a connection between clients and the real-time server. The connection must not be dropped between interactions with the server.
  • The server is running the authoritative part of the game, making sure that the players see the same state and don’t cheat. The server may also be running part of the game logic such as computer-controlled actors and in-game events. This needs to continue to run whether players are taking actions or not.

Since the real-time server is stateful, the load balancing needs to connect to the same server for all players in the same session. In an MMORPG this means the zones the players are allocated to a server and all players in those zones connect to that server. In Rune, this means that the room/game combination is allocated to a server in the same way.

More generically in load balancing, this is known as “sticky sessions.” When a connection is made to the load balancer an attribute/parameter of the connection is used to determine where the connection needs to go. This of course makes the load balancer that bit more complicated and often leads to custom load balancing solutions.

Database

For most online games, databases are key to maintaining the long running state and storing player profiles, levels etc. The central server uses the database to maintain state between invocations so it’s heavily used and operations often rely on results from the database. This behavior is common in web application architectures too and means being very careful with your database performance.

On the other hand, the real-time server use of a database cannot block operations. Real-time exchanges are measured in millisecond latency and any blocking based on a database is likely to degrade player experience. On the real-time server it’s generally preferred to avoid any database read access in the core network flows - instead pulling the data required at the start of the session and holding it in memory.

There are of course cases where actions in the real-time server where the database needs to be updated to reflect changes the player has made. Whenever possible keeping these interactions asynchronous is the best approach.

The matchmaking and real-time servers should have a separate database (or at least a different set of tables/schema) that they act on. This allows us to have different rules of engagement to the database in each case and to be able to tune the database in each scenario for its specific expected use.

The final point of database interaction is where the updates on the real-time server need to be passed back to the central server, or vice versa. Again, whenever possible this needs to be an asynchronous process so that it doesn’t interfere with the real-time server run-time operations.

Metrics

Final, but important, point: don’t forget metrics/observability. When scaling any system it’s key to be able to understand how the system is operating and even more how any change that you make affects the performance and stability.

Applying metrics after the fact is actually pretty hard, trying to instrument or interpret database everything once it’s all in place and the implementation has passed is time consuming and error prone.

When building a scalable system design and add the metrics to the features as they’re implemented. Having well-thought-out and intentional metrics is the only way to really tune and improve an architecture.

If you found this article interesting or have questions, drop by the Discord.

Subscribe to our newsletter for more game dev blog posts
We'll share your email with Substack
Substack's embed form isn't very pretty, so we made our own. But we need to let you know we'll subscribe you on your behalf. Thanks in advance!

· 7 min read
Kevin Glass

When building games as a coder, there’s one issue that prevents us from being motivated for a game more than anything else - art. Whether it’s conscious or not, if you're working on a project that you have to look at hundreds of times a day, it’s very hard to stay excited when it has programmer art. At Rune, I’m still building lots of games and tech demos, and each one is far easier to absorb and understand when the art is “good enough”.

The ideal case is finding an artist to work with who’s just as enamored with the game concept as you are. However, often artists have many options and the game needs to get to a certain level before they’ll engage.

If there’s one thing I tell anyone who asks about building hobby/indie games, it’s to get consistent, good enough art in place early. It’s motivating, it makes demos look better and it’s actually not that hard.

General Tips for Assets

Look for asset sets not one offs. It’s easy to find one sprite and just think that’s the one for your game. However, more important than great art is consistent art. If you can find a set that’s big enough to keep you fed for a while, that's better than the greatest single piece of art.

  • Look for simple art styles that you think you could extend. I’m a terrible artist but given a pattern to follow I can sometimes extend sets to cover what I need for my games. If you can understand how the art was built (lighting, colors etc) you’re in a better place to extend.
  • Check the license! First, be sure you understand what the license means to your project:
    • Can you continue using this art commercially?
    • Are you even allowed to redistribute the art in an open source repository?
    • Is extending the art allowed?
  • Check the ownership! Unfortunately the game asset world is littered with people stealing art and reselling it as their own. The best bet is to try and find the vendor’s actual website and evaluate it from there rather than on one of the market sites where everyone looks the same.

Here’s some of my favorite sources/approaches to free/low-cost art to bootstrap your project and keep you motivated. (I should note I’m in no way affiliated with any of these sites)

Graphics

Stylised / Geometry

The most common approach that developers take is using “stylised” graphics - pure geometry with some nice shader or shadows. Trust me this is one of the hardest things to make look good and requires a really good artist with understanding of color and dynamics. You might get lucky and just hit something that looks great but there are better options.

Kenney.nl

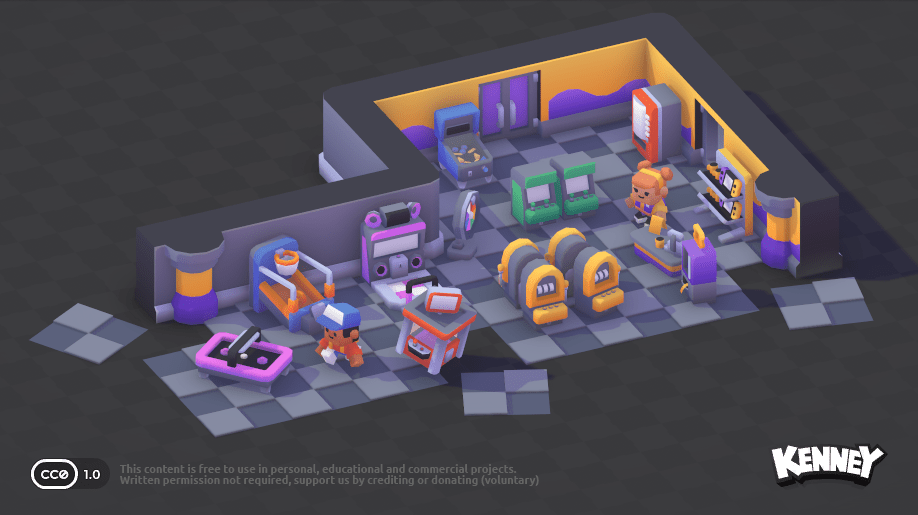
Kenney has been producing free game art for over a decade, and frankly he’s a bit of a hero of mine. He produces 2D, 3D and UI art and it’s all insanely good quality. What’s more it’s all released as CC0 - meaning you can use it however you choose even commercially.

https://kenney.nl/

Oryx Design Lab

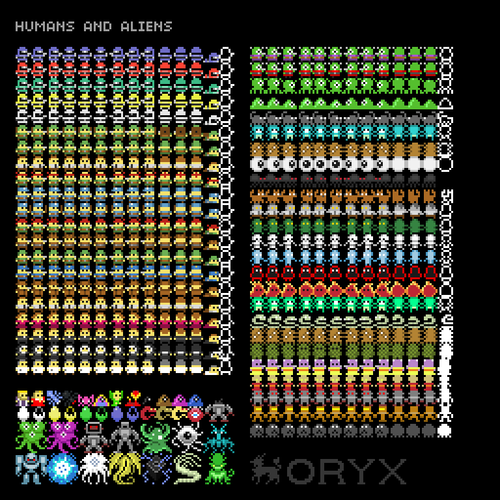
Oryx (who actually works for Bungie) started out by building a very simple sprite set for a game jam which resulted in the creation of Realm of the Mad God. It’s all 2D art and pretty low cost for what you’re getting. There are also sound effects available.

https://www.oryxdesignlab.com/

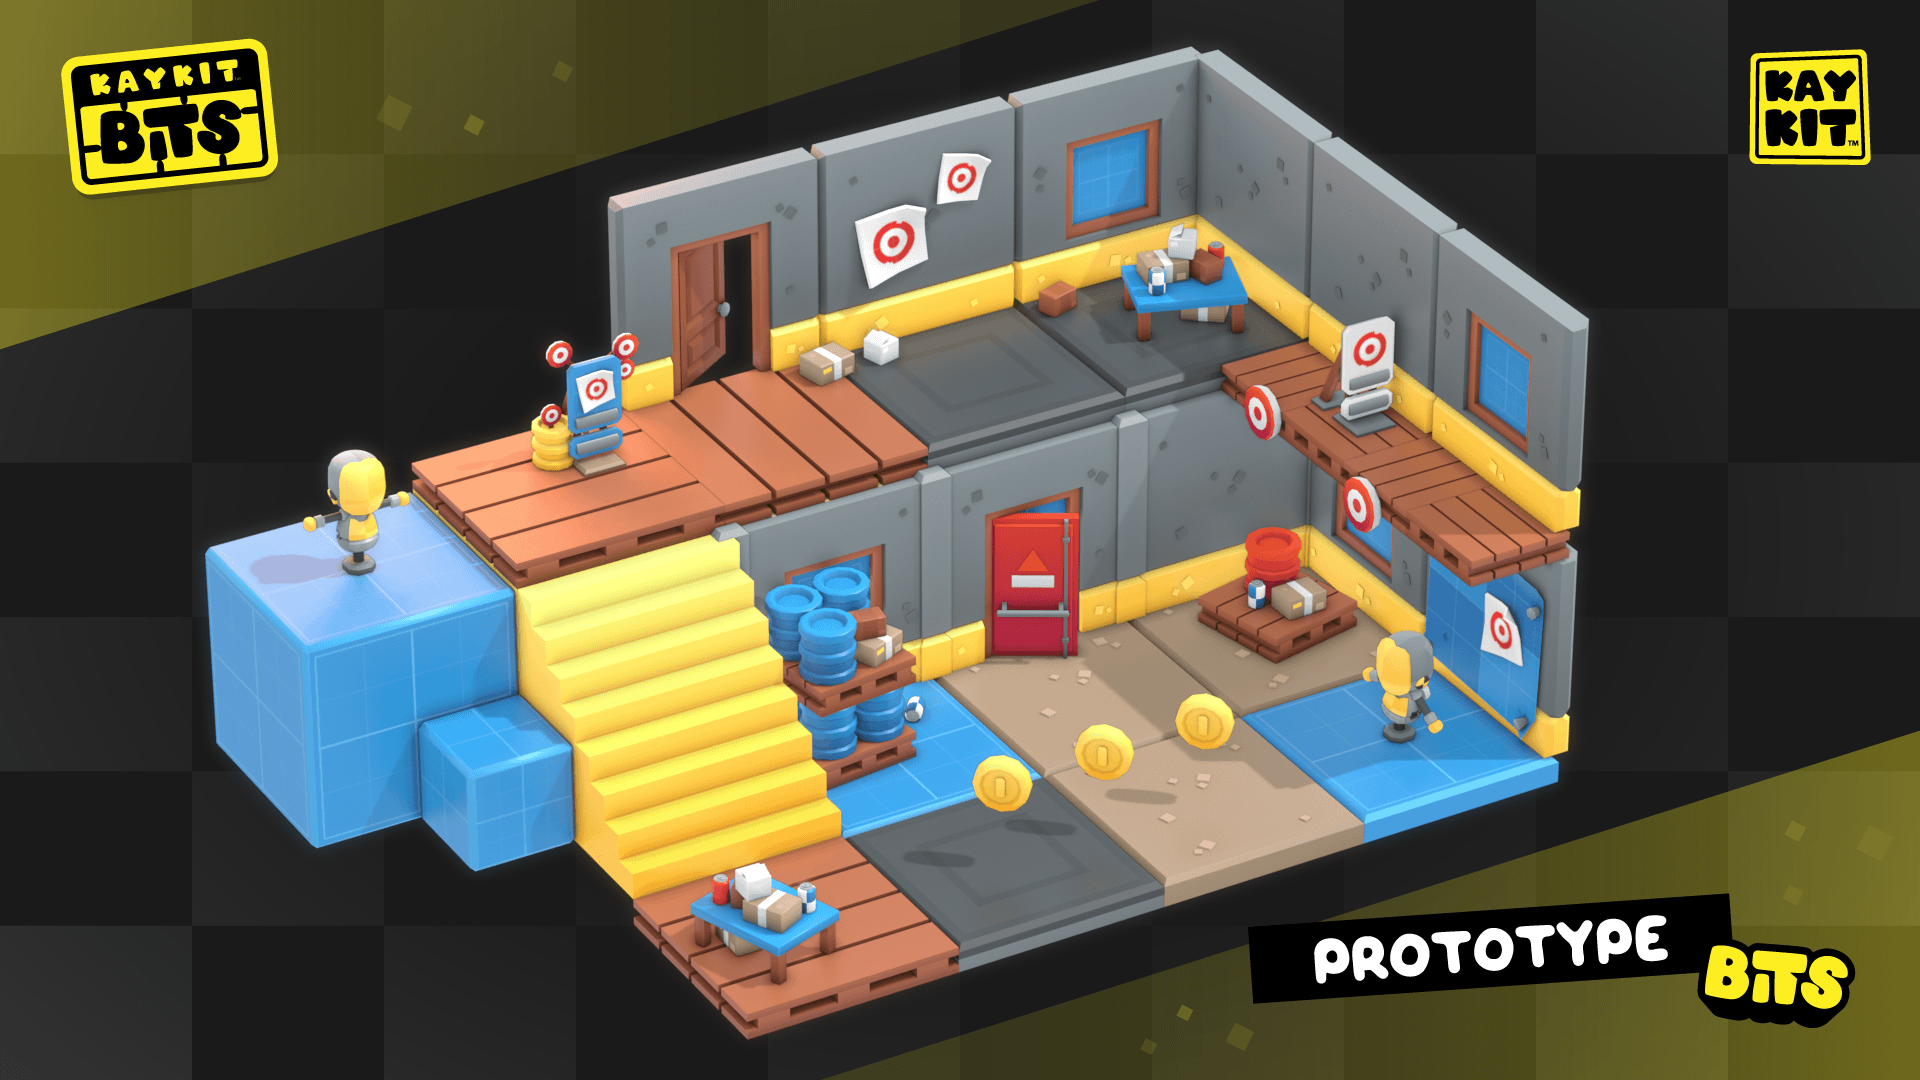
Kay Lousberg

Kay is a more recent arrival on the game asset scene but has definitely been taking a page out of the book of Kenney. The art is higher polycount but it pays off if you can stand it in your engine. The characters are nothing short of amazing and again low cost or patreon based.

https://kaylousberg.com/game-assets/

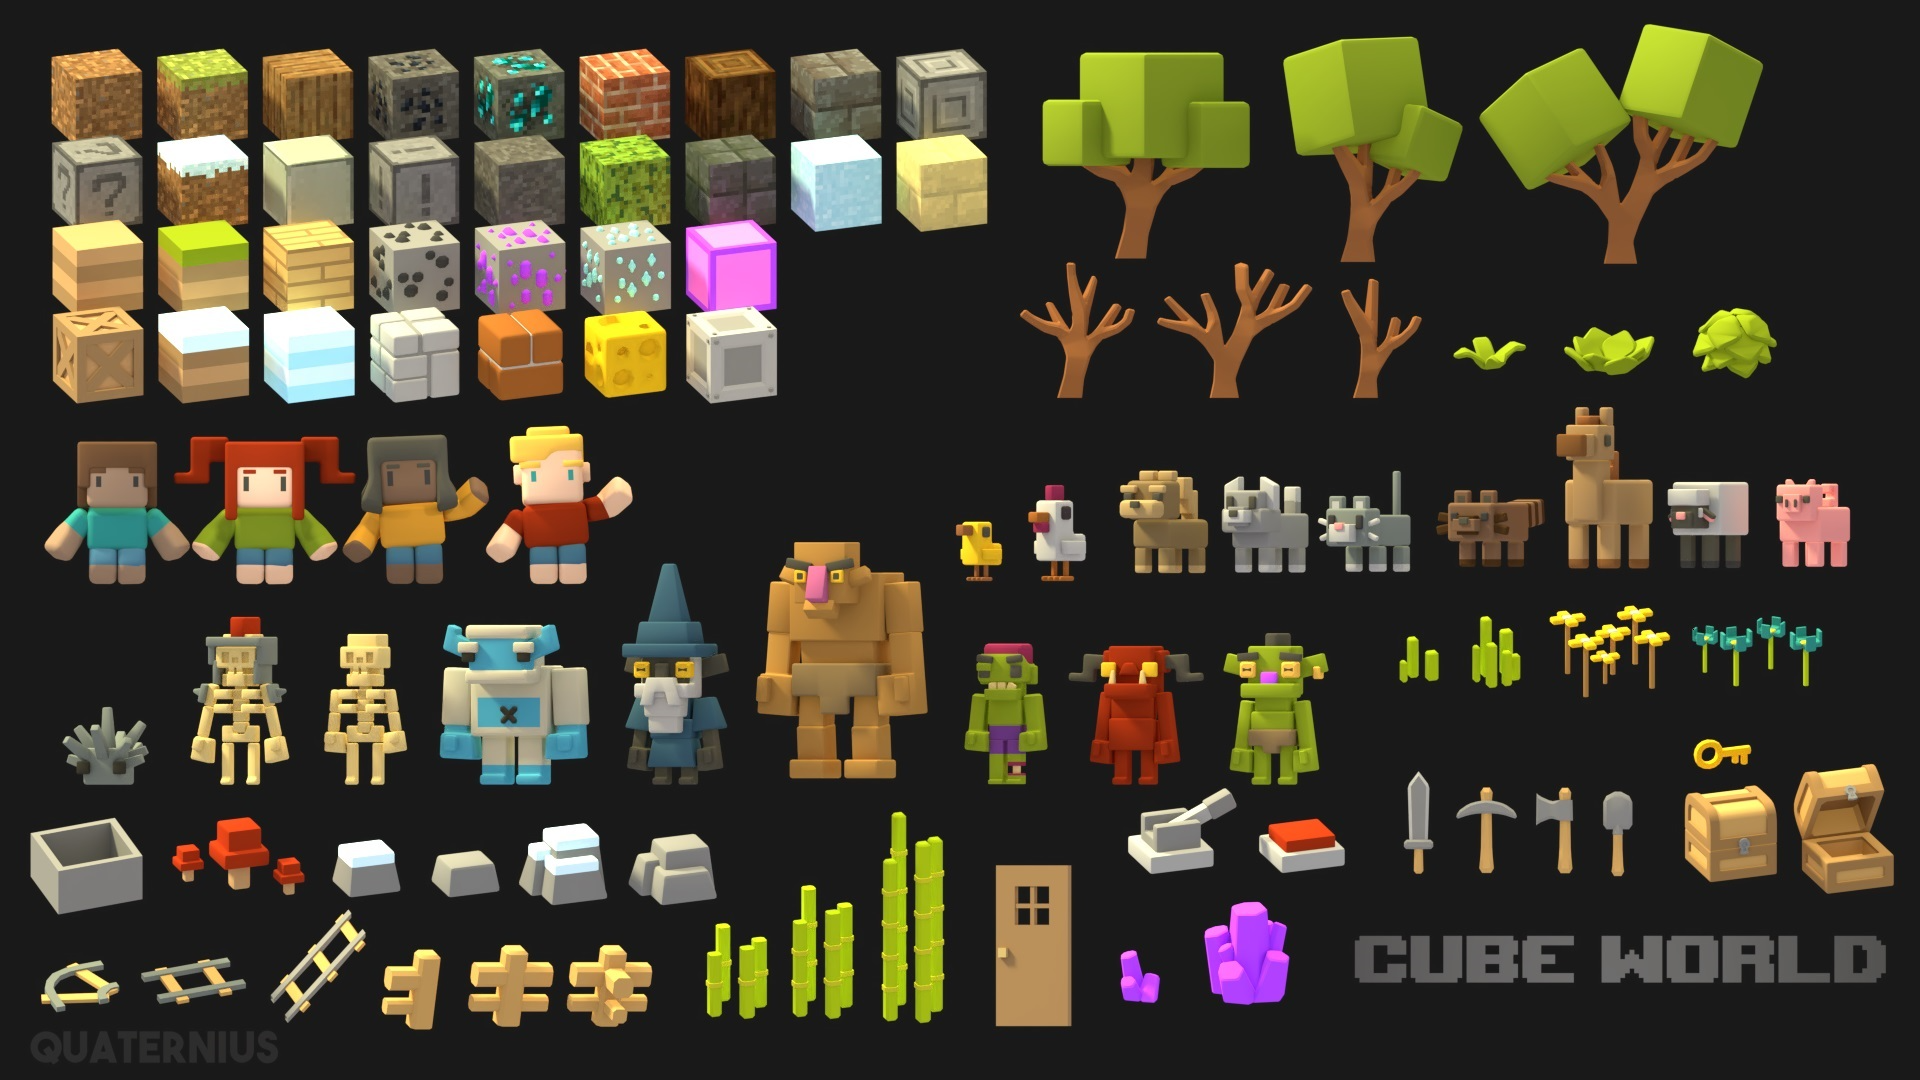
Quaternius

Quaternius was a new find for me thanks to the Rune game Cooking Frenzy. Really great low-poly 3D art and game ready.

https://quaternius.com/

Lost Garden

Daniel Cook has been working to produce game art and amazing games like Triple Town for a long time. Lost Garden is one of the first places I found game art that really worked for me.

https://lostgarden.com/tag/art/

itch.io

By now everyone knows about itch.io for both games and games assets. To say the amount of content is large is an understatement. Itch however can have several issues:

There are a lot of content authors who have just taken someone else’s assets and claimed them as their own. As mentioned above, Check the License! There are lots of individual resources but not many complete sets. There are some great authors producing large consistent sets but you need to find them. The quality is wide ranging, some of the art looks good but when trying to include the content it’s simply not game ready.

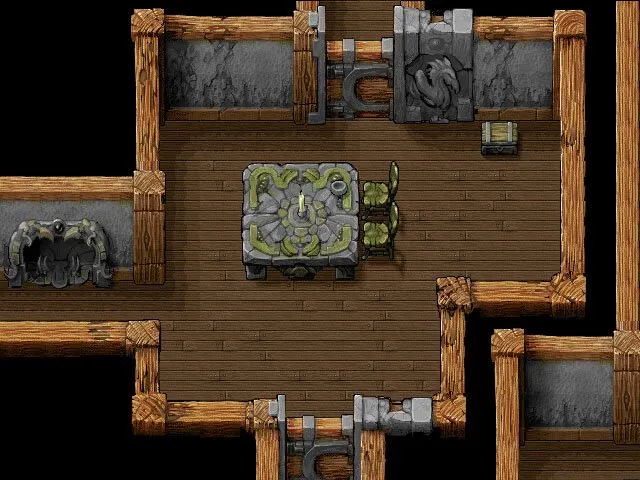
Some of my favorites from itch are Minifantasy (built an MMORPG from this one), Pixel Frog and Doodle Rogue.

CraftPix

CraftPix is a great collection of free and low cost art. The real wins here is the licensing is very clear and the assets are grouped together into consistent art styles. Well worth a look.

https://craftpix.net/

Open Game Art

Open Game Art collates a massive collection of old, retired and one off game graphics and sounds. The quality can be quite low but there are some gems hidden if you search carefully. Be careful with the license and ownership here, there are a lot of art resources added that don’t have permission.

https://opengameart.org/

Graphics River

Graphics River is a general art site for designers but has a section for game assets which is full of great resources. The quality can be extremely high but the price also reflects this making it the more expensive option of resources I choose. There are complete game kits that contain all the art you might need for specific types of games.

https://graphicriver.net/game-assets

On AI

An option becoming ever more popular is using AI to generate game assets. For me at least I find it great for generating single images, for instance I use it for social previews for blog articles. However when it comes to creating solid, consistent sets of arts across a whole game it doesn’t really work out. AI is great, but what you need is a real artist.

Sounds

Free Sound

Free Sound is the original open source sound effects library. It’s great for finding real atmospheric sounds but not so great for a set of consistent sound effects. Worth a look.

https://freesound.org/

Sound Snap

Sound Snap is a great source for free and low cost sound effects. The pricing model is slightly hard to work with but the quality of the resources makes it worth your time.

https://www.soundsnap.com/

Pixabay

Pixabay is another great source for free sound effects with clear licensing and a great search engine. This is my go-to site for game sound effects.

https://pixabay.com/sound-effects/

SFXR

If you’re more in the mood for creating your own sound effects you can’t go far wrong with SXFR. It’s a simple tool with dials and settings you can play with (or randomize) to get interesting new sounds for your games. Be warned, it’s a lot of fun and can be a time sink!

https://sfxr.me/

Eleven Labs

It’s really nice to have natural sounding voices in your game, and Eleven Labs is the low-cost way of doing this. The output is shockingly realistic and the tuning parameters let you create just the voice for your giant bandit frog.

https://elevenlabs.io/

Browser voice

If you want voices but you either can’t afford a commercial solution or you don’t want to ship huge sound files for all the audio in your game there is always the option of Web API Speech Synthesis.

The voices available are platform dependent and there's normally only a couple that actually sound good enough. However, for some games that's enough.

https://developer.mozilla.org/en-US/docs/Web/API/SpeechSynthesis

Do you know more sources or have experience with finding great art/sounds? Let us know on Discord.

Subscribe to our newsletter for more game dev blog posts
We'll share your email with Substack
Substack's embed form isn't very pretty, so we made our own. But we need to let you know we'll subscribe you on your behalf. Thanks in advance!

· 2 min read
Kevin Glass

Hey everyone! The moment we've all been impatiently waiting for is finally here! Rune’s 1st Jam has officially started and will run from today, August 1st 00:00 UTC, until August 11th 23:59 UTC.

The theme we’ve chosen for the occasion is... Creativity! 🧑‍🎨

This summer we want to help players unleash all of their imagination with the theme of "Creativity". Be it through playing in unique scenarios, experimenting with unconventional mechanics, giving life to mythical creatures, or interacting through drawing and images.

Focus on the aesthetics of the visuals and build a world of colors, shapes, and original designs: players should breathe creativity as soon as they step into the game 🎨 🏞️ Ensure that the game-play involves building, crafting, molding, to trigger the players’ creativity and stimulate their inventiveness 🏗️ 🪵 🧲 🚧

Seeking inspiration? Exploring these games might help getting you started:

Look at the above titles as simple suggestions to make your mind take off, rather than constraints for your ideas: this time we chose a fairly open theme because we want your creation to embody the spirit of artistic freedom and inventive game-play 💭

No matter your level of experience: your participation and your unique ideas are what is going to take to make Rune's 1st Jam unforgettable 🥳

Tech-demos and other open-source games can be used as the starting point for your jam submission! 🙂

We wish all of you the best luck ad we cannot wait to see the amazing games you'll come up with! Happy Jamming everyone! 😊 🙏

Come join us on the Discord to get involved!

Subscribe to our newsletter for more game dev blog posts
We'll share your email with Substack
Substack's embed form isn't very pretty, so we made our own. But we need to let you know we'll subscribe you on your behalf. Thanks in advance!